| “ | FFVIII x Mobius FF Recall the special promise that you made, hidden deep in the recesses of your heart. Journey with the Seed-in-training, Squall, and help him overcome the trials he and his fellow students face. |
„ |
| ~ In-game description |
The Sleeping Lion Episode 1, Part 1 is the first story chapter for the Final Fantasy VIII Collaboration Event. It features Squall from Final Fantasy VIII going through his SeeD Candidate exams.
Event Details
- Event type: Collaboration story region.
- First appearance: August 1 -
November 1, 2019November 15, 2019.
- The game service suffered a large-scale network outage in October 2019, preventing many players from logging into the game at all. In compensation, the event was extended an extra two weeks.
- Second appearance: March 27 - June 30, 2020 (end of service)
How to Participate
- Select "FFVIII: The Sleeping Lion Episode 1, Part 1" from the Act 2 world map -- its own red spot.
Upon entering this region for the first time, you are awarded the Squall job card. You MUST equip and use this job at all times while playing in this region. (you can also use the Squall Leonhart Ultimate Hero if you obtain it.)
Gameplay
Play in this section introduces a new mechanic: the Draw System. Once this skill is learned, you can draw extra abilities out of your enemies, and use those abilities against them! Most spells are relatively common, but some are rare and quite powerful. See the separate page for details.
As you progress through the story, you'll gradually increase your SeeD rank. Each rank comes with a "stipend": a set of extra rewards. Your current SeeD Rank is shown by an icon in the top corner of your map screen.
- The maximum Seed Rank for this region is 6, which you can earn by repeatedly defeating foes in the ending practice areas.
Story
Squall awakes in front of Balamb Garden, a bit unsure of where he is... or who he is. As he's waking, a girl greets him, worried about their coming exams. It takes a minute, but it all locks in. It's Selphie... er, Sophie, and they're classmates. Graff is nearby as well. Everyone is getting prepared for the SeeD exams.
Squall talks with Instructor Meia, who tells him that the Pandora simulator has been updated with newer foes, as practice for the exam. She recruits Sophie, and the three of them participate in a few simulated battles. Squall makes quick work of the simulated foes, and is pretty bored with it all, but Meia points out it's better to build skills without the risk. Still, if he wants a challenge... how about a fight against Ifrit? Not that much of a challenge, apparently.
After Ifrit is down, Squall finds a small crystal on the ground. It's a Rune... inside a simulator? Squall picks it up and gazes into it...
Wol is hiking up a hillside, while an Echo is explaining that Palamecia is getting weird. It's all the fault of that new Sorceress. So Wol needs to... whoops, vision over!
To be continued
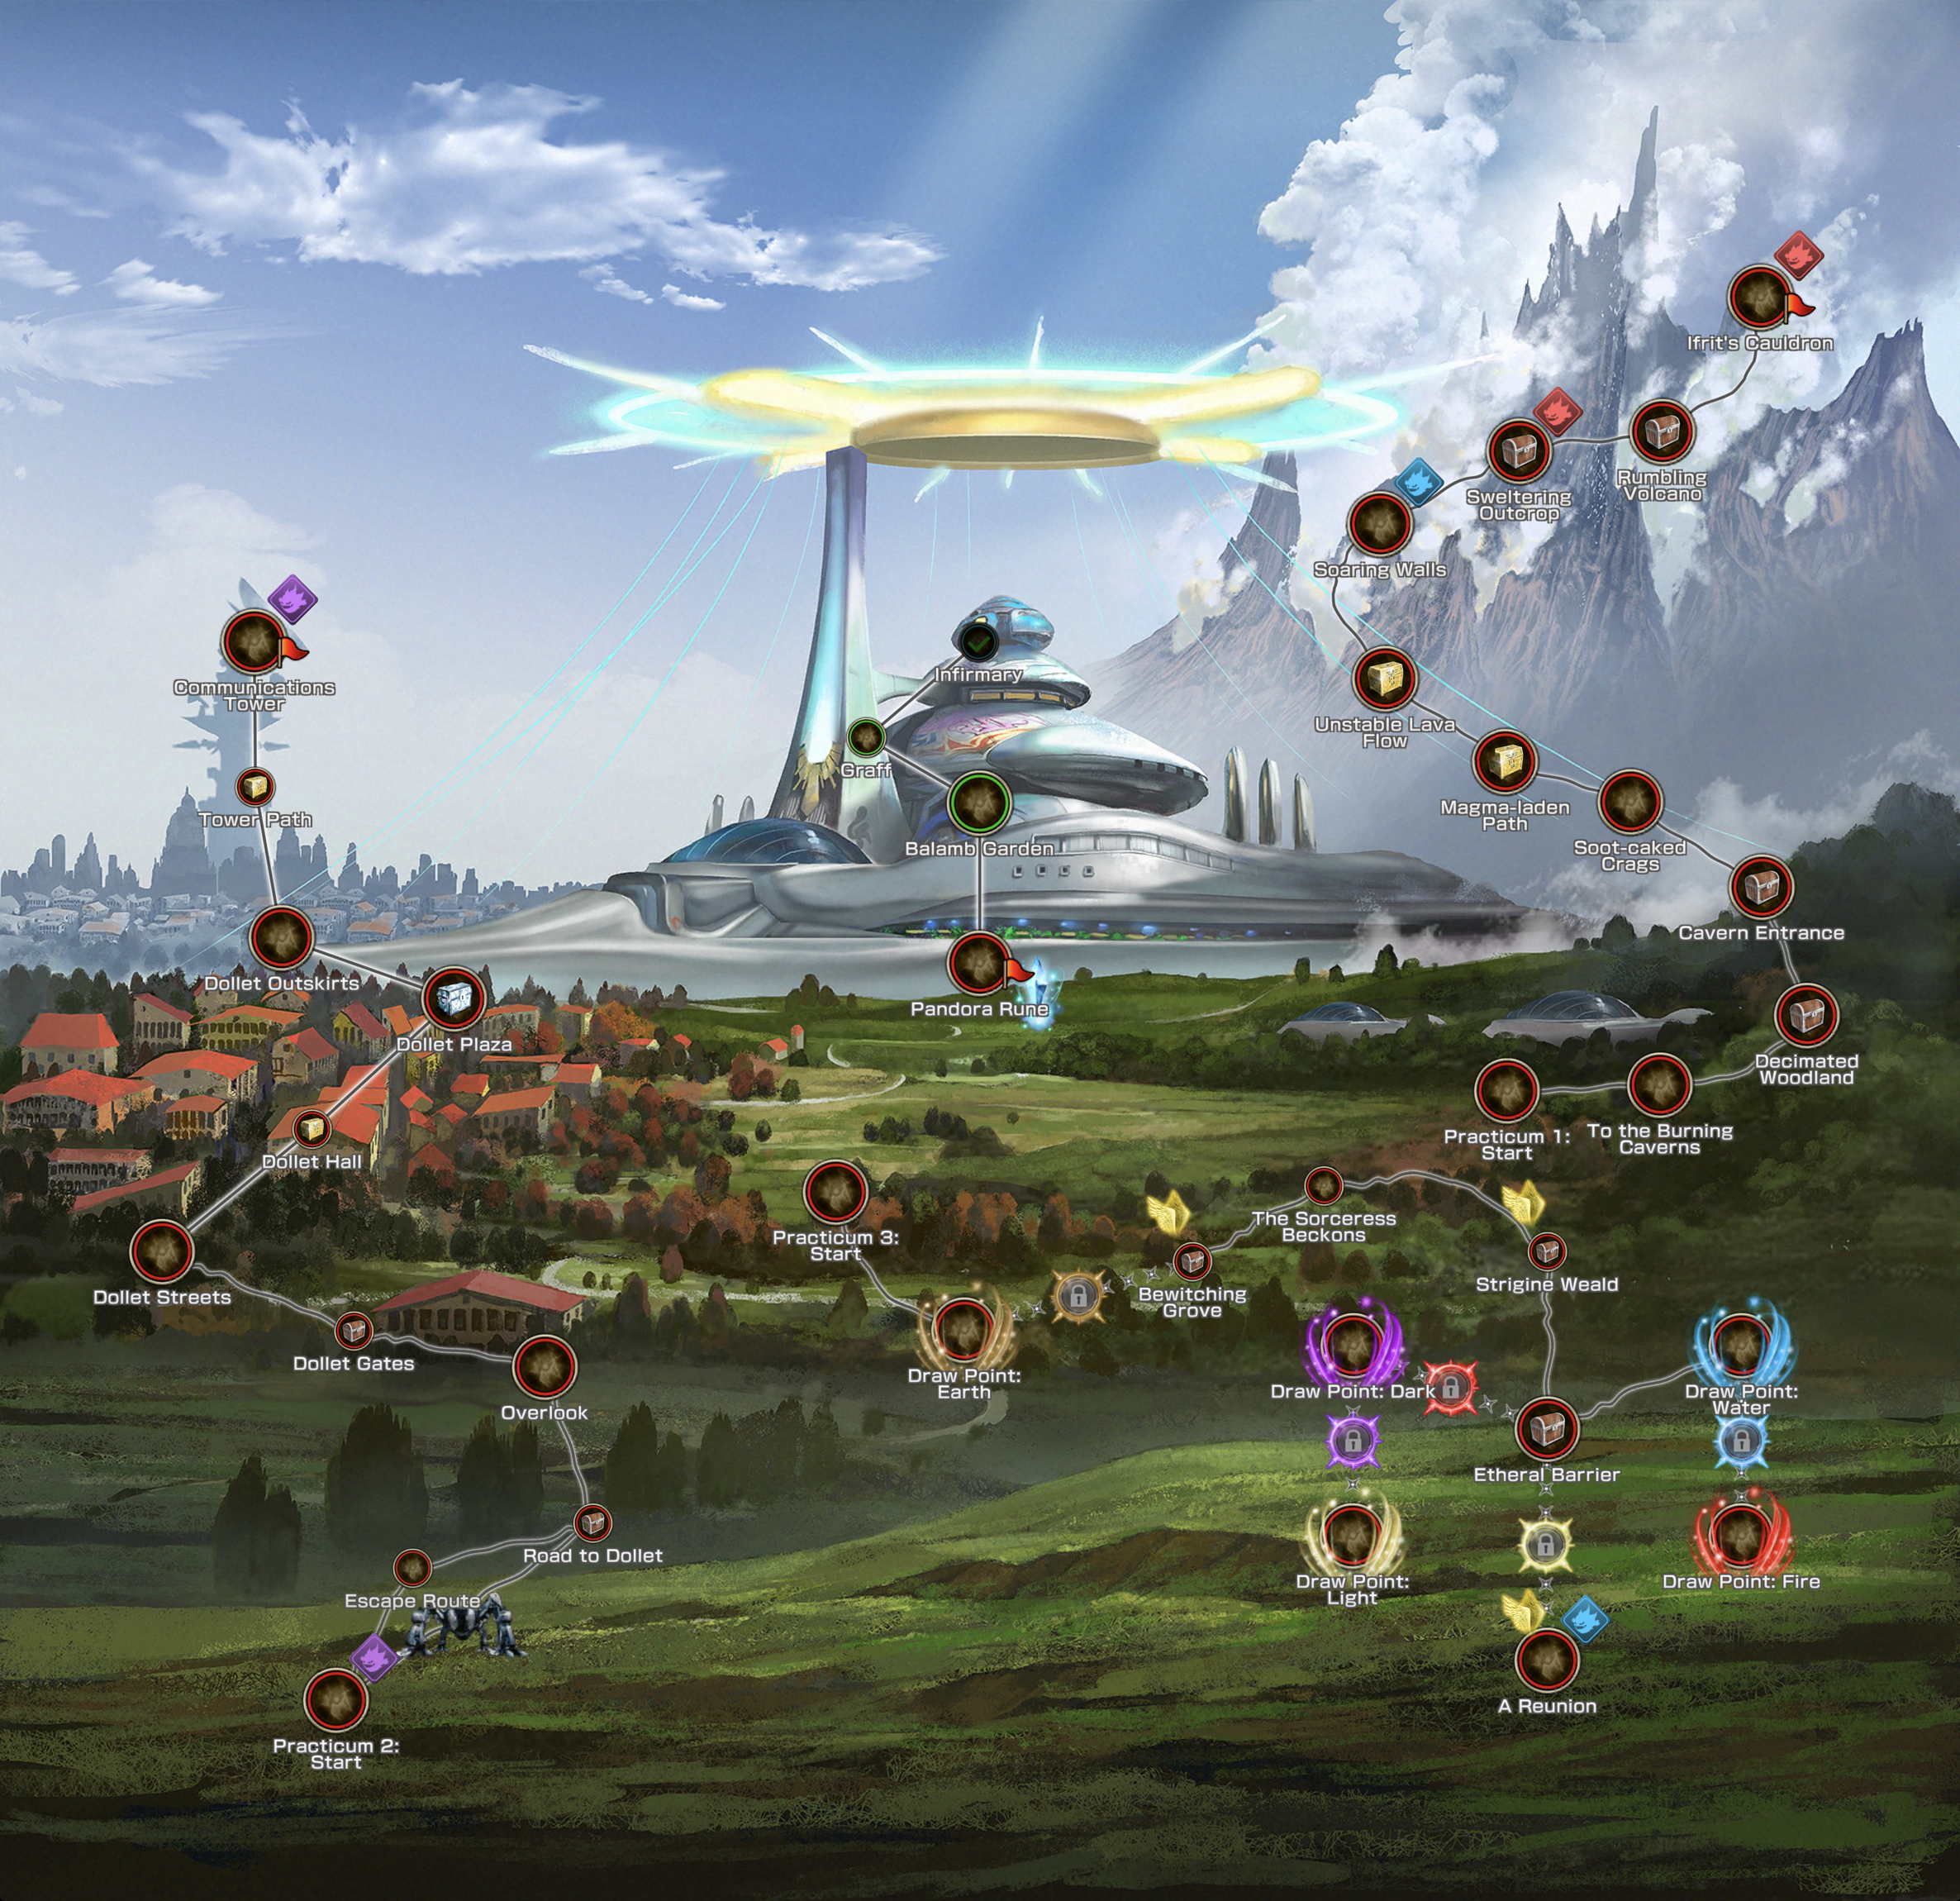
Event Map
| “ | Final Fantasy VIII: The Sleeping Lion Episode 1, Part 1: Balamb Garden Beyond the boundaries of time and space lies Balamb Garden, a place where SeeDs train to one day vanquish a sorceress. Here, the Lion sleeps, unaware of the trials about to take place. |
„ |
| ~ World Map description |
There are 37 areas in total, with 14 treasure chests.
You must equip either Squall (Job) or Squall Leonhart (Job) as your main job, although you can select any ![]() Warrior job under that for your choice of skills and elements. You can set a Sub-Job, but it will not be used in this region -- Job Change Recast is locked out -- but your first ability there can be used for sub-attacks, and the Sub-Job's Ultimate Ability can be used during a Mobius Zone double-Ultimate attack.
Warrior job under that for your choice of skills and elements. You can set a Sub-Job, but it will not be used in this region -- Job Change Recast is locked out -- but your first ability there can be used for sub-attacks, and the Sub-Job's Ultimate Ability can be used during a Mobius Zone double-Ultimate attack.
Areas
The First Trial
Concentration in these early areas is on learning the new Draw System. Normal abilities are locked out -- you must use either normal attacks or Drawn abilities to win. Also, enemies are extraordinarily slow, so they're unlikely to ever get a chance to attack before you kill them.
| Area | Stamina | Battles | Description | Reward |
|---|---|---|---|---|
| Infirmary | - | - | (Starting point. No fight. Inaccessible after you start.) | - |
| Graff | 1 | 0 | Set Squall in your main deck... and talk to students in Balamb Garden! |
- |
| Balamb Garden | 1 | 0 | - | |
| Pandora Rune | 2 | 1 | This is a tutorial for the FFVIII Collaboration battle system. Try drawing from your foe! |
- |
| Practicum 1: Start | - | - | (Starting point. No fight. Inaccessible after you start.) | - |
| To the Burning Caverns | 2 | 1 | This is a tutorial for the FFVIII Collaboration battle system. Learn how to check what abilities your foes have. |
- |
| Decimated Woodland | 2 | 2 | Try Drawing from different foes. |
|
| Cavern Entrance | 2 | 1 | This is a tutorial for the FFVIII Collaboration battle system. Learn how to check the effects of Drawn abilities. |
|
| Soot-caked Crags | 2 | 2 | Check what your Drawn abilities do before using them. |
- |
| Magma-laden Path | 2 | 2 | This is a tutorial for the FFVIII Collaboration battle system. Use the Draw & Cast button. |
|
| Unstable Lava Flow | 2 | 2 | Utilize Draw & Cast to claim victory. |
|
| Soaring Walls | 2 | 2 | This is a tutorial for the FFVIII Collaboration battle system. Use what you have learned to emerge victorious. |
|
| Sweltering Outcrop | 3 | 3 | Think about the best time to use Drawn abilities. |
|
| Rumbling Volcano | 3 | 4 | Use the Draw ability to seize victory. |
|
| Ifrit's Cauldron | 4 | 5 | Use the Draw ability to seize victory. |
The Second Trial
The enemies here are a normal bunch as far as damage, but they are suprisingly tough. Your normal abilities will not do nearly as much damage as you expect. Rely instead on Drawn abilities to finish them off... but do stock some Draws for the last round of each battle.
In this section, you work your way through the town of Dollet and up to the antenna... and then back again with enemies in pursuit!
| Area | Stamina | Battles | Description | Reward |
|---|---|---|---|---|
| Pandora Rune | 2 | 2 | The time for field training is upon you. Use the Draw ability to seize the day. |
- |
| Practicum 2: Start | 4 | 2 | - | |
| Road to Dollet | 4 | 3 | Combine slotted and Drawn abilities for best results. |
|
| Overlook | 4 | 3 | - | |
| Dollet Gates | 4 | 3 | ||
| Dollet Streets | 4 | 3 | - | |
| Dollet Hall | 4 | 4 | ||
| Dollet Plaza | 4 | 3 | ||
| Dollet Outskirts | 4 | 3 | - | |
| Tower Path | 4 | 4 | ||
| Communications Tower | 4 | 4 | A telecommunications tower rises high into the sky. You hear an ominous rumbling in the distance. |
|
| Tower Path | 3 | 1 | Omega is chasing you down! Draw Thundara and cast it to halt Omega's advance. |
- |
| Dollet Outskirts | 3 | 3 | Omega is chasing you down! |
- |
| Dollet Plaza | 3 | 3 | Omega is chasing you down! |
- |
| Dollet Hall | 3 | 3 | Omega is chasing you down! |
- |
| Dollet Streets | 3 | 3 | Omega is chasing you down! |
- |
| Dollet Gates | 3 | 4 | Omega is chasing you down! |
- |
| Overlook | 3 | 4 | Omega is chasing you down! |
- |
| Road to Dollet | 3 | 4 | Omega is chasing you down! |
- |
| Escape Route | 3 | 4 | Omega is chasing you down! |
- |
| Practicum 2: Start | 4 | 1 | Put an end to The crackling of lightning magic assaults your eyes. |
Growing Egg ★4 |
The Third Trial
| Area | Stamina | Battles | Description | Reward |
|---|---|---|---|---|
| Pandora Rune | 2 | 1 | This is a tutorial for the FFVIII Collaboration battle system. Beware foes that absorb same-element attacks. |
- |
| Practicum 3: Start | 4 | 2 | Follow the mysterious feather through the woods. Draw rare abilities from powerful foes. |
- |
| Draw Point: Earth | 4 | 1 | This is a tutorial on draw points. Draw an ability from an |
|
| Bewitching Grove | 4 | 3 | Follow the mysterious feather through the woods. Lock: |
|
| The Sorceress Beckons | 4 | 3 | Follow the mysterious feather through the woods. | - |
| Strigine Weald | 5 | 4 | ||
| Etheral Barrier | 3 | 3 | Follow the mysterious feather through the woods. | |
| Draw Point: Water | 2 | 1 | This is a water draw point. Draw an ability from a |
|
| Draw Point: Fire | 2 | 1 | This is a fire draw point. Draw an ability from a Lock: |
|
| Draw Point: Dark | 2 | 1 | This is a dark draw point. Draw an ability from a Lock: |
|
| Draw Point: Light | 2 | 1 | This is a light draw point. Draw an ability from a Lock: |
|
| A Reunion | 6 | 5 | Lock: |
Revolver+
|
Key Items
 SeeD Rank -- increases as the story progresses.
- Stone Shard
- Blizzard Shard
- Fire Shard
- Shine Shard
- Pain Shard
Special Fiends
- Galbadia Soldier -- comes in any element.
- Ifrit (Sicarius) in its new "Extreme Ifrit" form.
- Shiva (Sicarius) in its new "Extreme Shiva" form.
- Omega (Dark)
Reference
- Mobius News page
- Cinematics from BuffMeister on YouTube
- [ Reddit superthread]
Trivia
- Music is from Final Fantasy VIII soundtrack.
| Area | FFVIII track name |
|---|---|
| opening movie | Liberi Fatali |
| first areas | Balamb Garden |
| going to the Pandora | SeeD |
| inside Pandora | Blue Fields |
| Battles | Don't be Afraid |
| Battle victory | The Winner |
| Boss Fight | Force Your Way |
| Second Trial | The Mission |
| The Chase | Never Look Back |