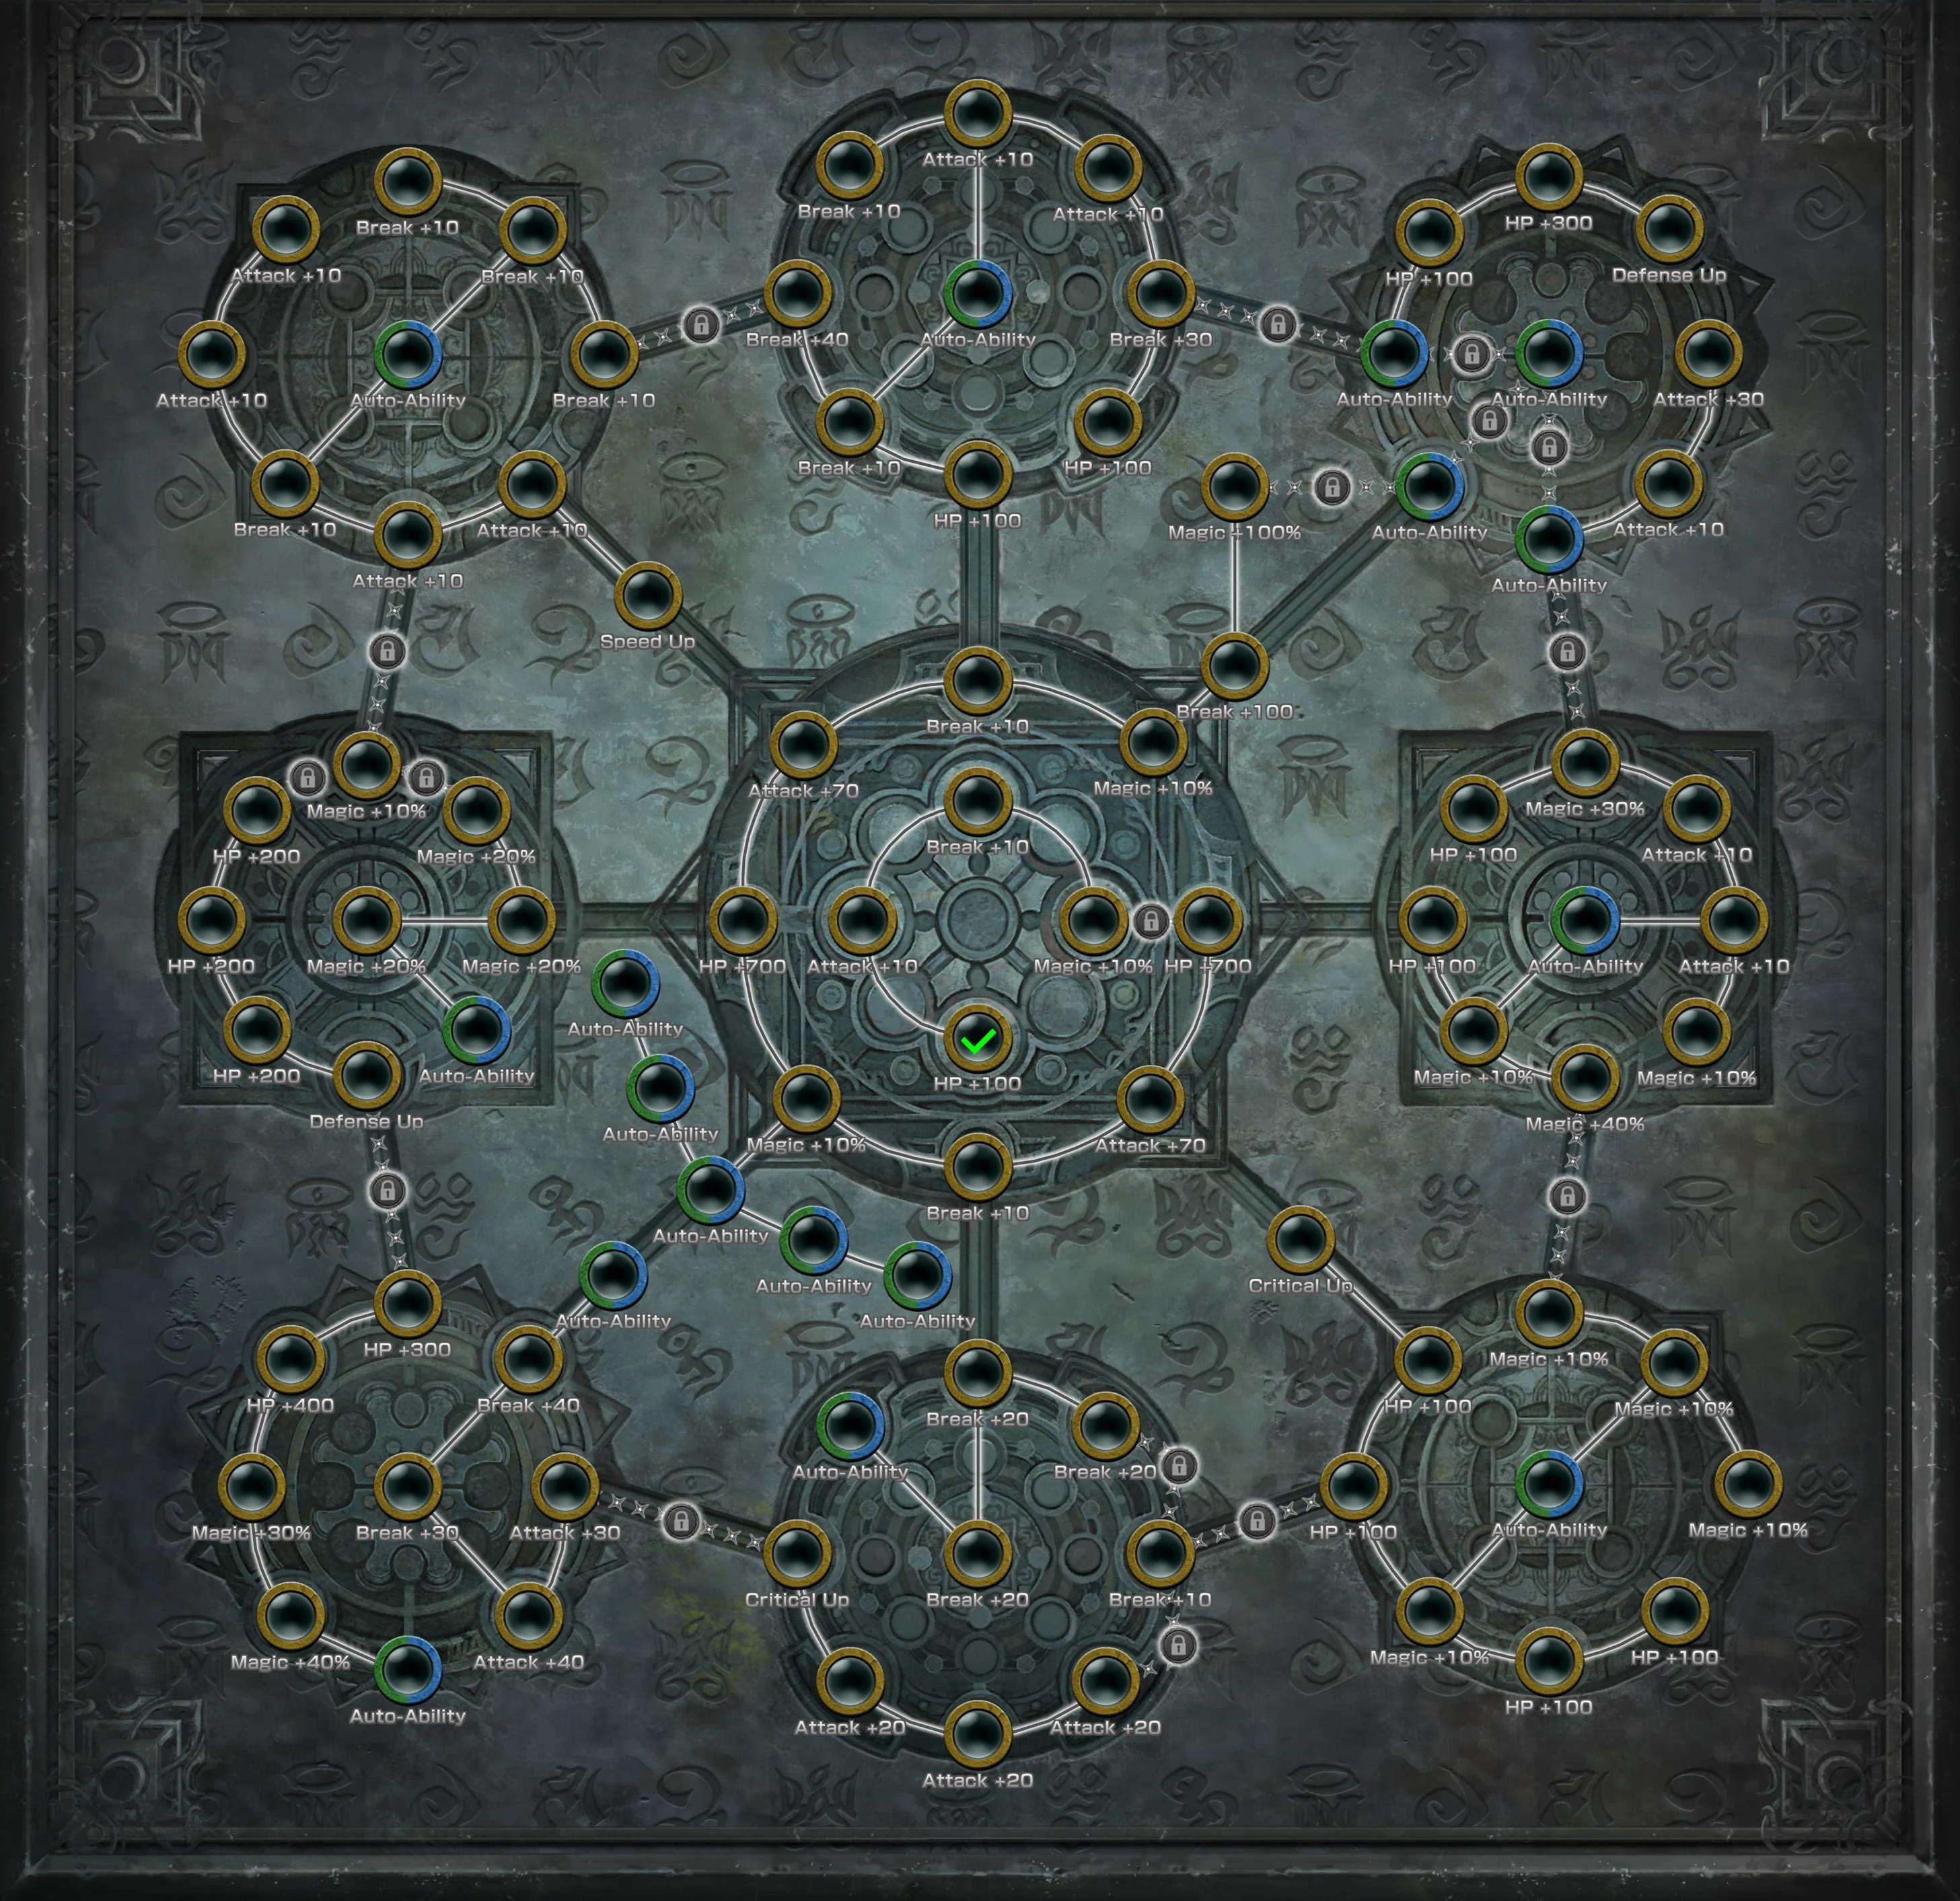
The Sphere Grid is a supplemental area for increasing abilities and character attributes in the Final Fantasy X Collaboration Event regions. It is first accessed during Dream Within a Dream, Part 2 and builds up as you progress through the rest of the Dream Within a Dream storyline.
The space is an analogue of the character development system used in Final Fantasy X. Here, attributes are directly applied as extra bonuses to whatever Job or Job Class is in use, including Meia jobs, Sarah jobs, and Ultimate Hero jobs.
 You can access this space from the Dream Within a Dream, Episode 2, Episode 3, and Episode 4 regions by tapping on the blue and gold icon near the top corner of the map screen.
 When you're finished clearing and activating spaces, you can return to your previous region by clicking the purple icon in the top corner of the map screen.
Spheres[]
Map spaces come in three main types:
 Attribute Areas (gold) take normal Attribute Spheres, and increase basic stats like Attack, Magic, and Break.
- Auto-Ability Areas (blue-green) take an Auto-Ability Sphere (blue) or Auto-Ability Sphere (green), as you choose.
- In between some areas are Area Locks, which take a Key Sphere of the same Level to open.
- Each area takes 3 battles to clear. None are expected to be very difficult, and they offer a fairly high chance of Cactuars, Metal Cactuars, Gold Cactuars, and the rare Golden Flan.
- The event's return in 2020 reduced required stamina to 1 and removed battles.
Activating spheres[]
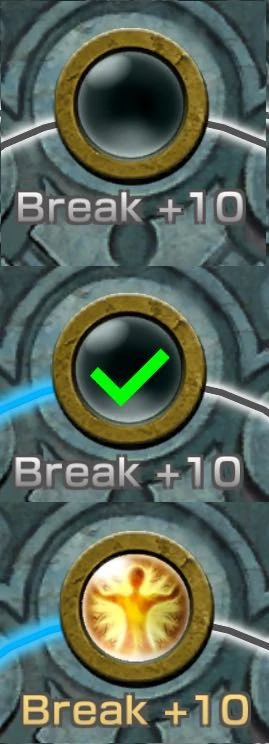
Once you have cleared an area by battling through it, you can activate it to give you the listed description:
- Open the Sphere List by tapping the gold icon in the top corner of the Sphere Grid Map screen. A list will show you all of your currently available spheres.
- Choose a sphere from the list. That sphere will be inserted into the space you're standing on.
- If it's a gold Attribute Sphere area, it will only take an Attribute Sphere. These set in place permanently.
- If it's an Auto-Ability Sphere area, it will take any Green or Blue Auto-Ability Sphere in your list. You can replace a previously activated Auto-Ability with a new one, and the old one will be returned to your Sphere collection, or you can remove the Auto-Ability sphere entirely, leaving an empty area.
- If it's a gold Attribute Sphere area, it will only take an
![]() After you've unlocked the first Key Sphere lock, you gain an extra button that will show you the effects of everything you currently have activated.
After you've unlocked the first Key Sphere lock, you gain an extra button that will show you the effects of everything you currently have activated.
Map Locations[]
There are 94 areas in total. None contain treasure chests or rewards.
Every gold area has the description:
- Growth Spheres contain untold power.
- Set an Attribute Sphere to unlock its potential.
Every blue/green area has the description:
- Set an Auto-Ability Sphere.
- You can change an existing Auto-Ability Sphere for a new one.
Episode 2[]
- Episode 2 offers 41 areas in the center, top, right and top-right. It consists of 35 Attribute areas, 6 Auto-Ability areas, and 6 Key Sphere locks. You only receive one Lv.6 Key sphere in this Episode, so you must choose one of two paths:
- the Top Center cluster for more Break power
- or the Middle Right cluster for more Magic power.
- A second lv.6 Sphere is awarded in Episode 3. Lv.7 locks continue from these clusters, sealed until Episode 3 opens.
Starting cluster: Center
| Area | Type | Stamina | Battles | Key Sphere lock |
|---|---|---|---|---|
| HP +100 | Attribute | 3 | 3 | (starting area) |
| Attack +10 | Attribute | 3 | 3 | |
| Break +10 | Attribute | 3 | 3 | |
| Magic +10 | Attribute | 3 | 3 | |
| HP +700 | Attribute | 3 | 3 | Lv.1 Key Sphere |
| Attack +70 | Attribute | 3 | 3 | |
| Break +10 | Attribute | 3 | 3 | |
| Magic +10% | Attribute | 3 | 3 | |
| HP +700 | Attribute | 3 | 3 | |
| Attack +70 | Attribute | 3 | 3 | |
| Break +10 | Attribute | 3 | 3 | |
| Magic +10% | Attribute | 3 | 3 | |
| Break +100 | Attribute | 3 | 3 | |
| Magic +100% | Attribute | 3 | 3 |
Top Right
| Area | Type | Stamina | Battles | Key Sphere lock |
|---|---|---|---|---|
| Auto-Ability | Auto-Ability | 3 | 3 | Lv.2 Key Sphere |
| Auto-Ability | Auto-Ability | 3 | 3 | Lv.3 Key Sphere |
| Auto-Ability | Auto-Ability | 3 | 3 | Lv.4 Key Sphere |
| Attack +10 | Attribute | 3 | 3 | |
| Attack +30 | Attribute | 3 | 3 | |
| Auto-Ability | Auto-Ability | 3 | 3 | Lv.5 Key Sphere |
| HP +100 | Attribute | 3 | 3 | |
| HP +300 | Attribute | 3 | 3 | |
| Defense Up (Defense ★ : +5%) | Attribute | 3 | 3 |
Middle Right
| Area | Type | Stamina | Battles | Key Sphere lock |
|---|---|---|---|---|
| Magic +30% | Attribute | 3 | 3 | Lv.6 Key Sphere |
| HP +100 | Attribute | 3 | 3 | |
| Attack +10 | Attribute | 3 | 3 | |
| Attack +10 | Attribute | 3 | 3 | |
| Magic +10% | Attribute | 3 | 3 | |
| Auto-Ability | Auto-Ability | 3 | 3 | |
| Magic +10% | Attribute | 3 | 3 | |
| HP +100 | Attribute | 3 | 3 | |
| Magic +40% | Attribute | 3 | 3 |
Top Center
| Area | Type | Stamina | Battles | Key Sphere lock |
|---|---|---|---|---|
| Break +30 | Attribute | 3 | 3 | Lv.6 Key Sphere |
| HP +100 | Attribute | 3 | 3 | |
| Attack +10 | Attribute | 3 | 3 | |
| Attack +10 | Attribute | 3 | 3 | |
| Break +10 | Attribute | 3 | 3 | |
| Auto-Ability | Auto-Ability | 3 | 3 | |
| Break +10 | Attribute | 3 | 3 | |
| HP +100 | Attribute | 3 | 3 | |
| Break +40 | Attribute | 3 | 3 |
Episode 3[]
- Episode 3 offers 25 more areas across the corners, and branching from the center. It consists of 18 Attribute areas and 7 Auto-Ability areas. You get a Lv.6 sphere to finish the unused cluster from Episode 2, and two Lv.7 Key Sphere to cover everything available to this point. The branches continue from Episode 2, working around the perimeter:
- the Top Left cluster offers more Break, Attack, and Speed
- the Bottom Right cluster offers more Magic, HP, and Criticals.
- The ends of each cluster are sealed until Episode 4 opens.
Center branch
| Area | Type | Stamina | Battles | Key Sphere lock |
|---|---|---|---|---|
| Auto-Ability | Auto-Ability | 3 | 3 | |
| Auto-Ability | Auto-Ability | |||
| Auto-Ability | Auto-Ability | |||
| Auto-Ability | Auto-Ability | |||
| Auto-Ability | Auto-Ability |
Top Left
| Area | Type | Stamina | Battles | Key Sphere lock |
|---|---|---|---|---|
| Break +10 | Attribute | 3 | 3 | Lv.7 Key Sphere |
| Break +10 | Attribute | 3 | 3 | |
| Break +10 | Attribute | 3 | 3 | |
| Auto-Ability | Auto-Ability | 3 | 3 | |
| Break +10 | Attribute | 3 | 3 | |
| Attack +10 | Attribute | 3 | 3 | |
| Attack +10 | Attribute | 3 | 3 | |
| Attack +10 | Attribute | 3 | 3 | |
| Attack +10 | Attribute | 3 | 3 | |
| Speed Up (Speed +★) | Attribute | 3 | 3 |
Bottom Right
| Area | Type | Stamina | Battles | Key Sphere lock |
|---|---|---|---|---|
| Magic +10% | Attribute | 3 | 3 | Lv.7 Key Sphere |
| Magic +10% | Attribute | 3 | 3 | |
| Magic +10% | Attribute | 3 | 3 | |
| Auto-Ability | Auto-Ability | 3 | 3 | |
| Magic +10% | Attribute | 3 | 3 | |
| HP +100 | Attribute | 3 | 3 | |
| HP +100 | Attribute | 3 | 3 | |
| HP +100 | Attribute | 3 | 3 | |
| HP +100 | Attribute | 3 | 3 | |
| Critical Up (Crit Chance ★ : +5%) | Attribute | 3 | 3 |
Episode 4[]
- Episode 4 offers 18 more areas in the middle sections. It consists of 16 Attribute areas and 2 Auto-Ability areas. You get four Lv.8 spheres in the course of the episode, allowing all of the clusters to eventually unlock:
- the Middle Left cluster offers more Magic, HP, and Defense.
- the Bottom Center cluster offers more Break, Attack, and Criticals.
- The ends of each cluster are sealed until the Conclusion opens.
Middle Left
| Area | Type | Stamina | Battles | Key Sphere lock |
|---|---|---|---|---|
| Magic +10% | Attribute | 3 | 3 | |
| Magic +20% | Attribute | 3 | 3 | Lv.8 Key Sphere |
| Magic +20% | Attribute | 3 | 3 | |
| Magic +20% | Attribute | 3 | 3 | |
| Auto-Ability | Auto-Ability | 3 | 3 | |
| HP +200 | Attribute | 3 | 3 | Lv.8 Key Sphere |
| HP +200 | Attribute | 3 | 3 | |
| HP +200 | Attribute | 3 | 3 | |
| Defense Up (Defense ★ : +5%) | Attribute | 3 | 3 |
Bottom Center
| Area | Type | Stamina | Battles | Key Sphere lock |
|---|---|---|---|---|
| Break +10 | Attribute | 3 | 3 | |
| Break +20 | Attribute | 3 | 3 | Lv.8 Key Sphere |
| Break +20 | Attribute | 3 | 3 | |
| Break +20 | Attribute | 3 | 3 | |
| Auto-Ability | Auto-Ability | 3 | 3 | |
| Attack +20 | Attribute | 3 | 3 | Lv.8 Key Sphere |
| Attack +20 | Attribute | 3 | 3 | |
| Attack +20 | Attribute | 3 | 3 | |
| Critical Up (Crit Chance ★ : +5%) | Attribute | 3 | 3 |
Conclusion[]
- The Conclusion offers the final 10 areas in the bottom left -- 5 for each of the branches coming into the cluster.
Bottom Left
| Area | Type | Stamina | Battles | Key Sphere lock |
|---|---|---|---|---|
| HP +300 | Attribute | 3 | 3 | Lv. 9 Key Sphere |
| HP +400 | Attribute | 3 | 3 | |
| Magic +30% | Attribute | 3 | 3 | |
| Magic +40% | Attribute | 3 | 3 | |
| Auto-Ability | Auto-Ability | 3 | 3 | |
| Attack +30 | Attribute | 3 | 3 | Lv.9 Key Sphere |
| Attack +40 | Attribute | 3 | 3 | |
| Break +30 | Attribute | 3 | 3 | |
| Break +40 | Attribute | 3 | 3 | |
| Auto-Ability | Auto-Ability | 3 | 3 |
Fiends encountered[]
- Gold Bomb
- Elemental Wisps
- Elemental Essences
- Lesser Bombs
- Greater Bombs
- Shadow Fiends
Trivia[]
Music is from Final Fantasy X Remaster soundtrack:
| Area | FFX track name |
|---|---|
| Sphere Grid | The Splendid Performance |
| Battles | Battle Theme |