| “ | Final Fantasy VII meets MOBIUS FF
When the call of destiny echoes across the world, they will reunite here, in Palamecia. Here is where all will be decided. Fatal Calling - The Call of Destiny |
„ |
| ~ In Game Description |
Mako City Midgar is the main Region of Fatal Calling Part 1 -- one of the Final Fantasy VII Collaboration Events. The story features many of the characters from Final Fantasy VII, including the return of Cloud and the introduction of Sephiroth.
Event Details[]
- Event type -- dungeon crawl.
- First Instance -- Feb 1 - Mar 31, 2018
- Second Instance -- Dec 14, 2018 - Jan 31, 2019
- Third Instance -- March 27 - end of service, June 2020
Story[]
Continued from the first part of Northern Cavern.
Wol shows up at the city of Midgar, to the chagrin of Cloud -- he did warn Wol to stay away from Sephiroth for his own safety. Wol has his reasons, but Cloud is, of course, "Not interested." The two split up to find a way into the first Reactor.
Echo reminds our two heroes that Midgar is in Palamecia, so it's subject to the Laws of Palamecia. There will be trials... and it's no good trying to avoid them. The first trial: get through Security in a specific order. How annoying. Luckily, the path is fairly straightforward.
The two fight their way to the core of the first Mako Reactor, and Cloud holds up his Huge Materia. It shines for a second, and the Reactor shuts down. Cloud explains that the sphere is crystallized Mako energy, which drains out the Reactor. So the more reactors the two can hit, the better... and the more powered-up the Huge Materia will get. Off to the other Reactors, then.
At the gate for Reactor 2, Wol feels someone calling to him. Or maybe it's calling Cloud... but the final core for Reactor 2 has nothing out of the ordinary. Cloud shuts it down, and the two move on.
Reactor 3 seems rather sparsely defended... and that worries Wol. Is it a trap? But Cloud says "He's waiting for me." And sure enough, he is. Sephiroth is at the Reactor, extolling the virtues of despair... and throwing a Sicarius at our heroes! They're up to the challenge, though, and they beat the Sicarius down.

Is Sephiroth a wizard or summoner? No, says Cloud, he's never shown that. He's a hero, and the greatest SOLDIER ever. But something went wrong, and Cloud can't -- or won't -- say what. Wol initially chalks that up to memory loss -- Palamecia does that to memories -- but eventually confronts Cloud on what his intentions are. Cloud doesn't know, but he's confident that a full confrontation will show him the true meaning of hope AND despair. Good enough, says Wol.
But when they reach the core for Sector 4... no Sephiroth. Cloud feels his presence at the center of the city. A swift search, and there he is! Sephiroth is happy that Cloud answered his call. They are two of a kind, and Sephiroth pushes him to remember.... Reunion. The thought throws Cloud into confusion, and it's up to Wol to finish the dark champion off.

The battle is long and hard, but Wol gets the upper hand. He is about to lay Sephiroth low when Cloud snaps out of his reverie and attacks. With a flourish of black feathers, Sephiroth counters the two heroes and runs Cloud through with his endless sword! But it's not Cloud's time to die yet. He still doesn't know true despair. Also, while Palamecia is filled with suffering, it isn't the world promised to him. He spies the Huge Materia that Cloud was energising, and with a wave he drains it dry. Turning to Wol, Sephiroth says he is waiting for those who know despair to come to him... in Nibelheim. Cloud can find him there, where it all began.
And with a puff of black feathers, Sephiroth is gone.
To be continued, in Fatal Calling Part 2: Nibelheim.
Event Map[]
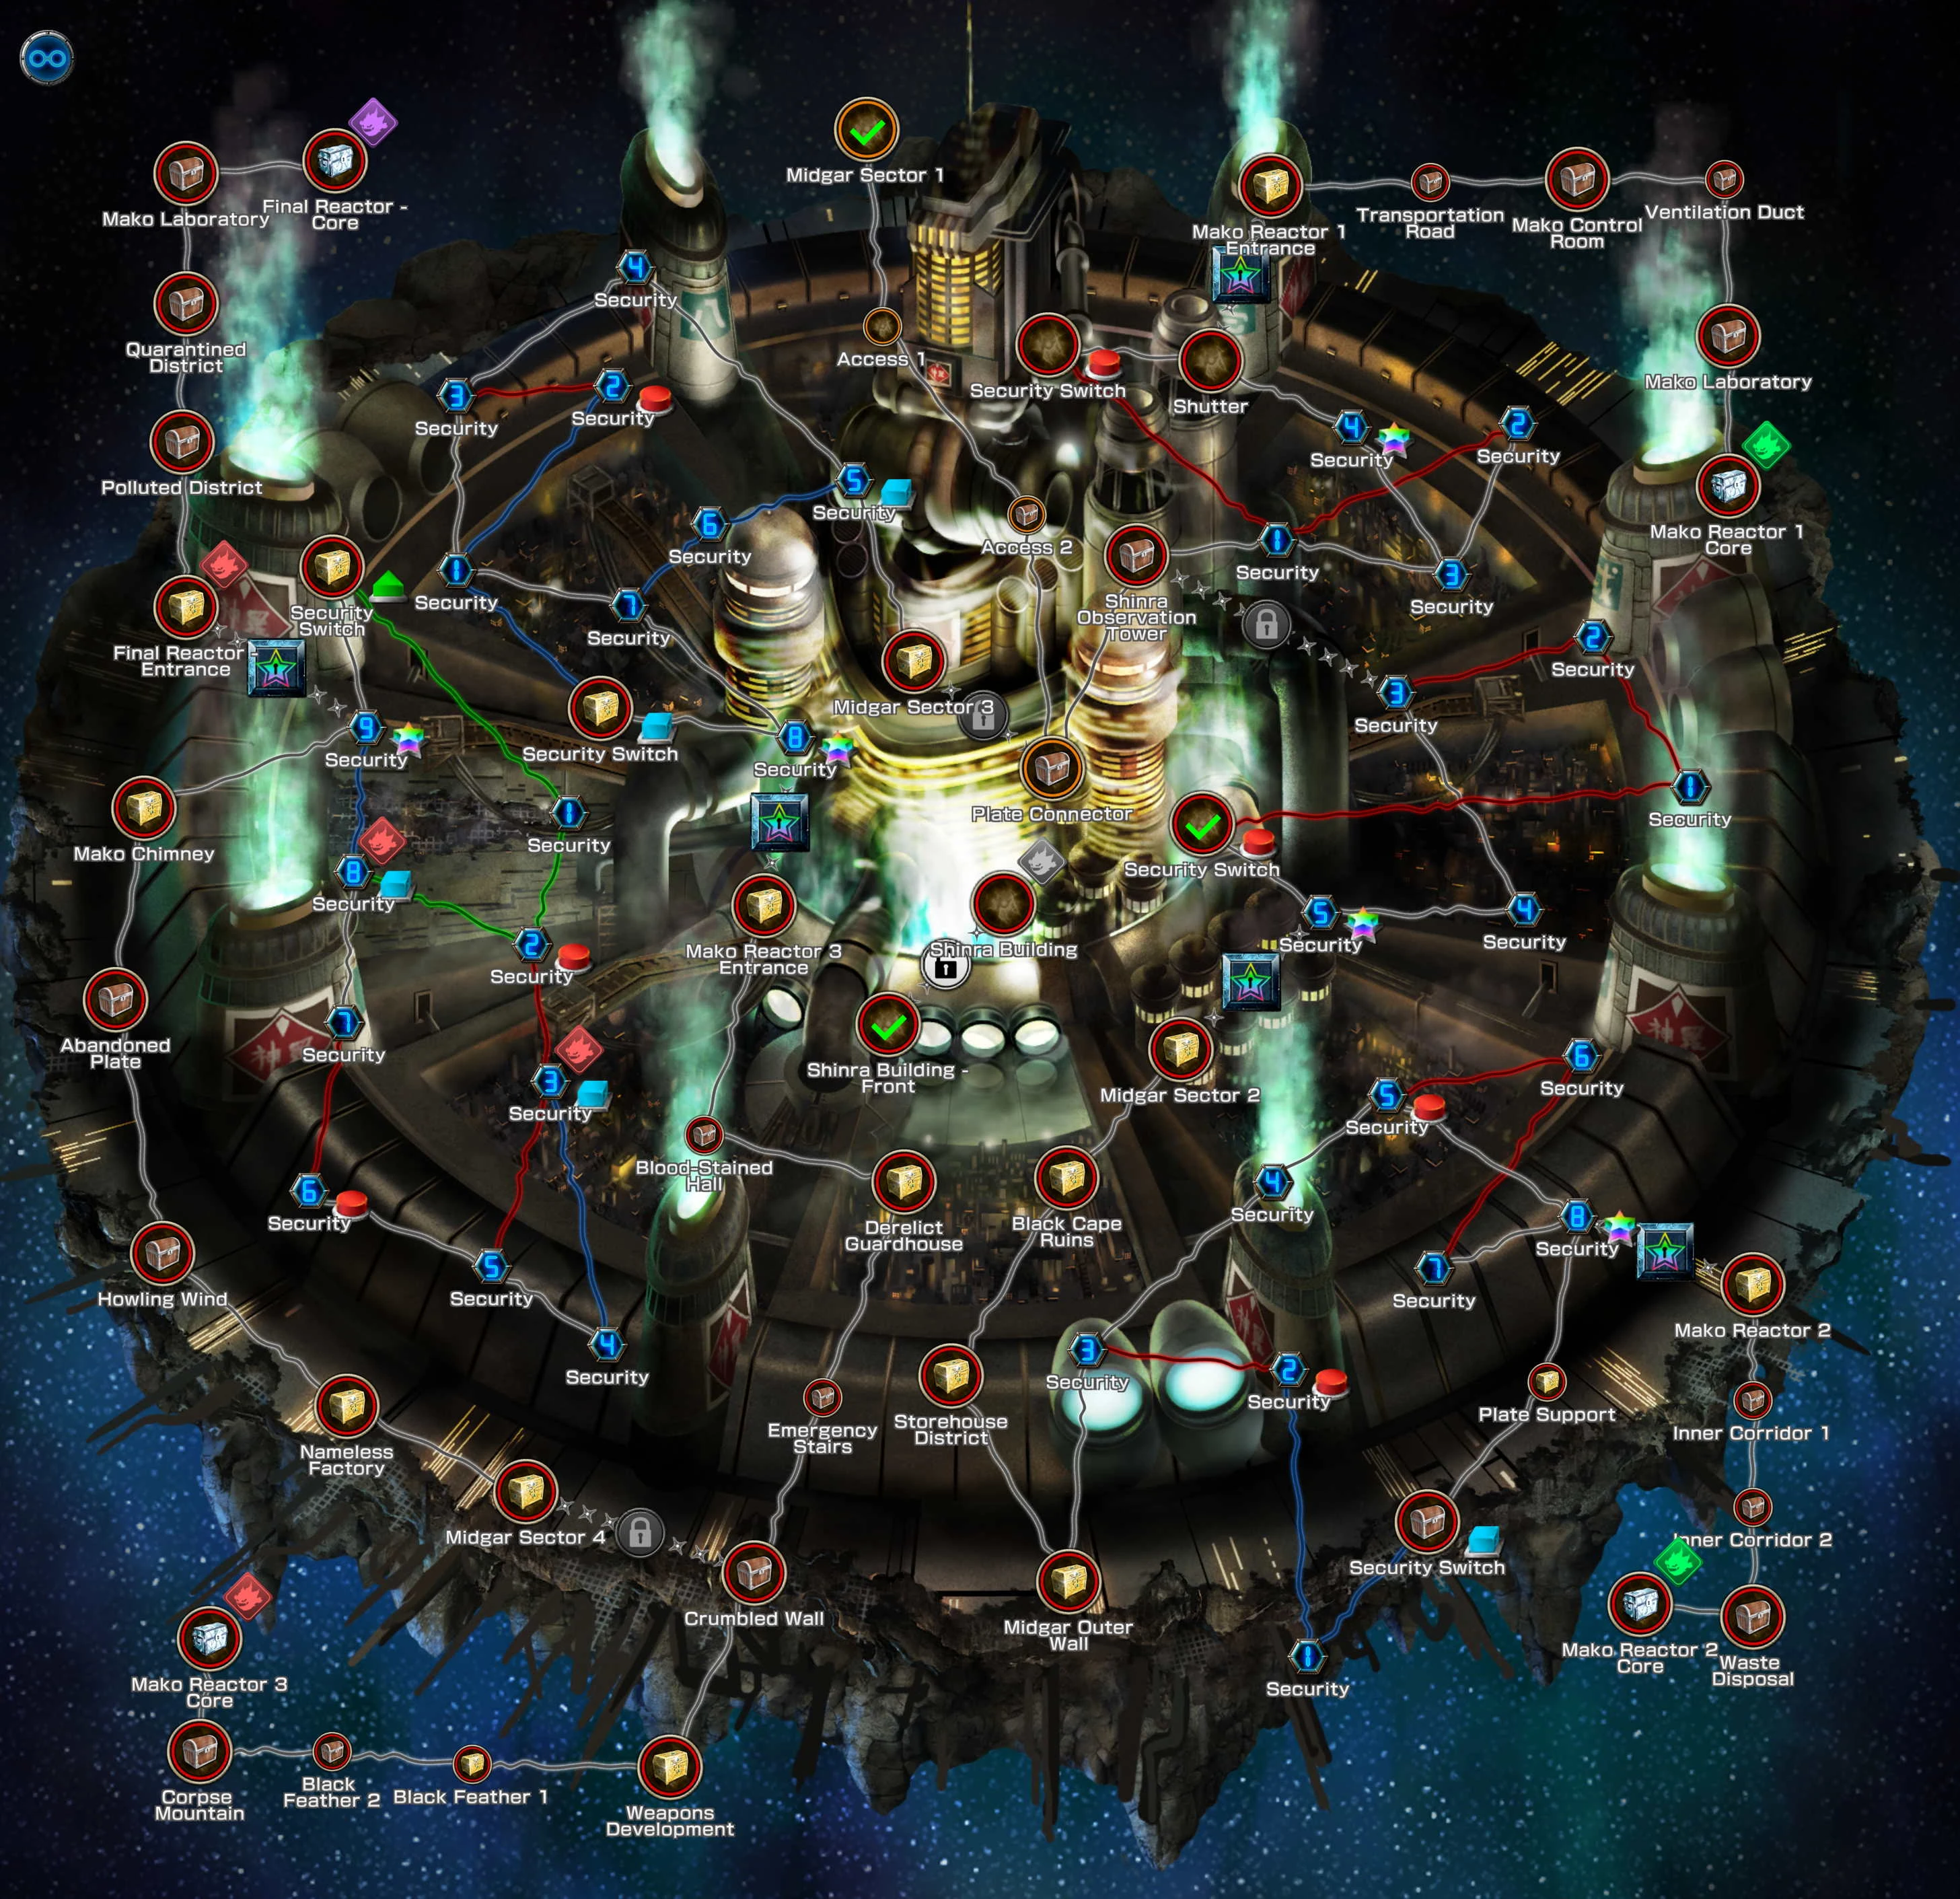
| “ | You find yourself in a darkly gleaming mako city that drains its power from the life of the planet itself. Slip past security, and claim the power of the Mako. | „ |
| ~ World Map description |
Many of the paths on this map are locked, and require specific switches to be thrown to gain access.
There are 84 areas in total on this map, including 44 treasure chests, 9 locked routes, and 34 Security nodes. Difficulty may scale depending on how strong you are, so enemies may vary from player to player.
Security Zones[]

Some sections of the region contain Security areas that must be cleared in a specific order. The path will change based on switches you press when you stop at various areas on the board, allowing you a direct path to the next one in order.
At some point the new path will not be enough. There is an extra button just below the Materia button that enables you to switch the path back to the default, allowing you to continue.
Map Locations[]
| Area | Stamina | Battles | Enemy description | Notes | Reward |
|---|---|---|---|---|---|
| Midgar Sector 1 | 5 | 3 | Starting area. | - | |
| Access 1 | 5 | 3 | - | - | |
| Access 2 | 6 | 4 | - | ||
| Plate Connector | 6 | 4 | Security: Medical Team sighted. | - | |
| Shinra Observation Tower | 5 | 3 | - | ||
| Security (1) | 6 | 3 | - | - | |
| Security (3) | 5 | 3 | Security: Medical Team sighted. | - | - |
| Security (2) | 5 | 4 | Security: Dadaluma Squad sighted. | - | - |
| Security (4) | 6 | 4 | ★ switch 1 (during security unlock) | - | |
| Shutter | 5 | 3 | - | - | |
| Security Switch | 7 | 5 | Security: Dadaluma Squad sighted. | Red Security switch. | - |
| Mako Reactor 1 Entrance | 8 | 4 | Obtain |
★ Lock 1 | |
| Transportation Road | 6 | 3 | - | ||
| Mako Control Room | 7 | 4 | - | ||
| Ventilation Duct | 5 | 3 | - | ||
| Mako Laboratory | 7 | 3 | - | ||
| Mako Reactor 1 Core | 9 | 5 | - |
| |
| Security (3) | 5 | 3 | Lock: Shut down Reactor 1 | - | |
| Security (4) | 7 | 4 | - | - | |
| Security (2) | 6 | 4 | - | - | |
| Security (1) | 4 | 3 | - | - | |
| Security (5) | 6 | 4 | Security: Medical Team sighted. | ★ switch 2 (during security unlock) | - |
| Security Switch | 9 | 5 | - | ||
| Midgar Sector 2 | 5 | 3 | ★ Lock 2 | ||
| Black Cape Ruins | 7 | 4 | - | ||
| Storehouse District | 4 | 3 | - | ||
| Midgar Outer Wall | 7 | 4 | Security: Medical Team sighted. | - | |
| Security (3) | 6 | 4 | - | - | |
| Security (4) | 8 | 4 | - | - | |
| Security (5) | 7 | 4 | Security: Dadaluma Squad sighted. | Red security switch 3b | - |
| Security (8) | 5 | 3 | ★ switch 3 (during security unlock) | - | |
| Security (7) | 7 | 4 | Security: Medical Team sighted. | - | - |
| Security (6) | 7 | 4 | Security: Dadaluma Squad sighted. | - | - |
| Security (2) | 8 | 5 | Red security switch 3a | - | |
| Security (1) | 5 | 3 | - | - | |
| Plate Support | 5 | 4 | - | ||
| Security Switch | 9 | 5 | Blue security switch 1 | ||
| Mako Reactor 2 | 6 | 4 | ★ Lock 3 | ||
| Inner Corridor 1 | 9 | 4 | Security: Medical Team sighted. | - | |
| Inner Corridor 2 | 6 | 4 | Security: Dadaluma Squad sighted. | - | |
| Waste Disposal | 8 | 4 | - | ||
| Mako Reactor 2 Core | 11 | 4 | - |
| |
| Midgar Sector 3 | 6 | 3 | Lock: shut down Reactor 2 | ||
| Security (5) | 8 | 4 | Blue security switch 2 | - | |
| Security (4) | 7 | 5 | Security: Acheron Squad sighted. | - | - |
| Security (3) | 5 | 4 | - | - | |
| Security (1) | 6 | 4 | - | - | |
| Security (7) | 5 | 3 | - | - | |
| Security (8) | 6 | 3 | ★ Switch 4 (during security unlock) | - | |
| Security (2) | 6 | 5 | Red security switch 3 | - | |
| Security (6) | 9 | 4 | - | - | |
| Security Switch | 9 | 5 | Blue security switch 2 | ||
| Mako Reactor 3 Entrance | 7 | 4 | ★ Lock 4 | ||
| Blood-Stained Hall | 6 | 4 | Security: Manticore Squad sighted. | - | |
| Derelict Guardhouse | 6 | 4 | Security: Acheron Squad sighted. | - | |
| Emergency Stairs | 8 | 5 | - | ||
| Crumbled Wall | 7 | 4 | - | ||
| Weapons Development | 10 | 5 | - | ||
| Black Feather 1 | 6 | 4 | Security: Evil Eye Squad sighted. | - | |
| Black Feather 2 | 7 | 4 | - | ||
| Corpse Mountain | 9 | 5 | - | ||
| Mako Reactor 3 Core | 12 | 5 | - |
| |
| Midgar Sector 4 | 7 | 5 | Lock: shut down Reactor 3 | ||
| Nameless Factory | 6 | 4 | Security: Kurohabaki Squad sighted. | - | |
| Howling Wind | 9 | 5 | - | ||
| Abandoned Plate | 7 | 4 | - | ||
| Mako Chimney | 6 | 4 | Security: Ghost Ship Squad sighted. | - | |
| Security (9) | 8 | 4 | ★ Switch 5 (during security unlock) | - | |
| Security (1) | 4 | 4 | - | - | |
| Security (2) | 6 | 5 | Red security switch 4 | - | |
| Security (3) | 6 | 5 | Blue security switch 3 | - | |
| Security (4) | 7 | 6 | - | - | |
| Security (5) | 5 | 4 | - | - | |
| Security (6) | 5 | 5 | Security: Manticore Squad sighted. | Red security switch 4 | - |
| Security (7) | 5 | 4 | - | - | |
| Security (8) | 6 | 5 | Blue security switch 3 | - | |
| Security Switch | 7 | 4 | Green Security switch | ||
| Final Reactor - Entrance | 9 | 4 | ★ Lock 5 | ||
| Polluted District | 6 | 4 | Security: Mermaid Squad sighted. | - | |
| Quarantined District | 7 | 4 | - | ||
| Mako Laboratory | 9 | 6 | - | ||
| Final Reactor - Core | 13 | 5 | - |
| |
| Shinra Building - Front | 6 | 4 | Teleport point - no fight needed. | - | |
| Shinra Building | 20 | 7 | Can you defeat the legendary hero? |
Lock: |
Post-Campaign[]
Once the final area is cleared, the Mako Reactors regain their bosses. These are specially set up to drop specific materia if re-challenged:
| Area | Enemy | Reward |
|---|---|---|
| Mako Reactor 1 Core | ||
| Mako Reactor 2 Core | ||
| Mako Reactor 3 Core | ||
| Final Reactor - Core | ||
| Shinra Building |
Also, many of the other areas in the Mako Reactors offer specific Security Guards or Guard Hounds in large waves. These areas are great spots for farming the cards needed to upgrade Abilities from February and March 2018 summons batches.
Key Items[]
 Huge Materia -- from the Northern Cavern. Powers up with each Reactor shut down.
- Shinra Keycard -- needed to access various Reactors.
Special Enemies[]
- Security: Medical Team
- Security: Dadaluma Squad
- Security: Kurohabaki Squad
- Security: Mermaid Squad
- Security: Manticore Squad
- Security: Ghost Ship Squad
- Security: Evil Eye Squad
- Security: Acheron Squad
- Hedgehog Pie
- Guard Hounds in all six elements.
- Guard Scorpion Mk.I
- Guard Scorpion Mk.II
- Guard Scorpion Mk.III
- Ifrit (Sicarius)
- Sephiroth (Sicarius)