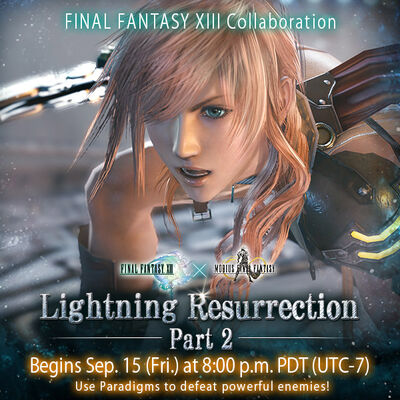
| “ | FINAL FANTASY XIII Collab Event
The Warrior of Light will free the lightning... The Lightning of the Prophecy has arrived, but will she remember her strength? |
„ |
| ~ In Game Description |
Lightning Resurrection, Part 2 is part of the Final Fantasy XIII Collaboration Event. The region features many of the characters from Final Fantasy XIII, Final Fantasy XIII-2, and Lightning Returns.
Event Details
- First appearance -- September 5 - October 29, 2017
- Second appearance -- April 1 - June 30, 2018
- Third appearance -- May 1 - July 1, 2019
- Fourth appearance -- March 27 - end of service, June 2020
This event is continued from Lightning Resurrection, Part 1.

How to Participate
Go to the Lightning Resurrection, Part 2 region spot on the World Map -- part of the red "specials" section.
You must have completed Chapter 1: Blank Slate and Lightning Resurrection, Part 1 to get there.
Story
Lightning is in a fight with the Sicarius Bahamut on the tracks of the Hanging Edge, while her Eidolon Odin stands by watching. Lightning is still weak, and the fight looks to be short, but a last-second salvo from Wol saves her. She's not happy. Wol doesn't need to be following her anymore. Wol disagrees, saying she did ask for his help... and hasn't paid him yet. With a huff, Lightning accepts his company.
So why would Odin merely watch instead of helping her? Because, she says, she's not really the true Lightning. Eidolons like Odin show up to claim those consumed by despair, but she had fought back against Odin and won, making him a strong friend. She's not certain if she can do that again, against Odin or Bahamut, but sees no other way to get her strength back.
Wol keeps fighting in her place, against fiends and Sicarius. It's working okay for moving them forward, but it's questionable about actually solving the problem: Lightning will have to fight for herself in the end. And there's more than despair here. Despair is just a quick way to die, as Wol has seen in Palamecia. There's an inner light that drives a person forward in spite of despair... but Lightning doesn't know where her light went. Perhaps that's the key.

With Odin's next fight, Lightning insists on doing it alone -- no help. Reluctantly, Wol complies. But it's a short time until Lightning lies defeated and despondent. Going against orders, Wol blocks the killing blow, yelling that it's hope that has kept her going. With a shock, Lightning realizes he's right -- it was hope. Wol knocks Odin out, and Odin acknowledges the change by giving Lightning a new Eidolith crystal.
That leaves one last thing: Wol's reward. Wol asks to see her strength... by fighting him! She readily agrees, since she's been itching to fight something. It's a titanic battle, but Wol gains the upper hand. It looks to be over, until Lightning counters with a super-powerful attack series that lays Wol flat. Wol is elated at the fight, and marvels that he ever thought he had a chance against someone fated to challenge the Gods.
And with that, Wol has fulfilled this part of the Prophecy: Lightning is free -- to go wherever and do whatever she wishes. She's thankful for the help, and offers a final thought: don't get too caught up in the challenge of the future. Let it come in its own time. She climbs atop Odin and disappears back to her own world. Maybe she'll see Palamecia again. Only time will tell.

Event Map
| “ | Robbed of her ability to fight, Lighting still throws herself into battle, as if by embracing despair she might find hope, and reclaim her light. | „ |
| ~ World Map Description |
There are 90 areas in total across three Sectors and two loops, including bridges (one-way routes), switches (locked routes), and 35 treasure chests.
Once the player finishes Sectors 6, 7, 8 and Final, extra areas open up.
- The Gigantuar Battlefield is a set of areas for collecting EXP and
 Crystals, similar to the Gigantuar Terrace region.
 - The Sicarius Towers offer ever-more-difficult battles against the four FFXIII Sicariuses, for Ability Tickets and Quartz.
- The Ultimate Realm is a set of areas with extremely difficult fights. Clearing all three wins an award of Ability Tickets x100.
The region is paired with Crystarium II, which contains further upgrades for Wol's paradigms. You can access the Crystarium by clicking the blue ![]() CP icon in the corner of the Map.
CP icon in the corner of the Map.
New Play Mechanics
The area contains a number of new mechanics and obstacles during play in this region:
- Bridges -- these are one-way paths from one area to another. In each case, you can't teleport to the destination -- you must go through the bridge to reach it. A bridge will reverse direction each time you cross it.
- Switches -- some bridges will not be open to cross until a relevant Switch has been passed. Once this is done, the entrance of the bridge will be accessible.
- Paradigms -- the Region has an extra set of benefits that can be invoked for one turn each. These are enabled and enhanced by completing areas within the Crystarium I and Crystarium II Regions. Benefit sets include Commando (attack), Ravager (break), and Sentinel (defense), with the occasional Shared enhancement.
The Sicariuses in this section are particularly hard. On opening, they will cast their main ability, wiping out 90% of your health on the spot, and then cast ![]() Break Immunity for 3 turns. You'll need to have 3 Sentinel Paradigms in reserve -- or a very good set of healing abilities -- to endure this. Once those 3 turns are over, the fight becomes much easier.
Break Immunity for 3 turns. You'll need to have 3 Sentinel Paradigms in reserve -- or a very good set of healing abilities -- to endure this. Once those 3 turns are over, the fight becomes much easier.
Map Locations
| Area | Stamina (later runs) |
Battles (later runs) |
Lock requirements | Enemy notes | Reward |
|---|---|---|---|---|---|
| Hanging Edge | 5 | 3 | Starting point. | - | |
| Sector 6 South Trussway 1 | 5 | 3 | - | ||
| Sector 6 South Trussway 2 | 5 | 4 | |||
| Sector 6 West Trussway 1 | 7 | 4 | - | Obtain Zidane: DISSIDIA FF (scroll). |
- |
| Sector 6 West Trussway 2 | 5 | 3 | - | ||
| Mechanized Bridge A: Switch | 5 | 3 | Switch | - | |
| Mechanized Bridge A: Connector | 5 | 3 | - | - | |
| Sector 6 Central Trussway 1 | 5 | 3 | - | Obtain Chrysaor (scroll). |
- |
| Sector 6 Central Trussway 2 | 5 | 3 | - | ||
| Mechanized Bridge B: Switch | 5 | 3 | Switch | - | |
| Sector 6 Central Trussway 3 | 7 | 4 | - | Obtain Manadrive Fang. |
- |
| Mechanized Bridge B: Connector | 5 | 3 | - | - | |
| Sector 6 Detour | 5 | 3 | - | ||
| Mechanized Bridge C: Switch | 5 | 3 | Switch | - | |
| Sector 6 Central Trussway 4 | 5 | 3 | - | Obtain Raksasa (scroll). |
- |
| Mechanized Bridge C: Connector | 5 | 3 | - | - | |
| Sector 6 North Trussway 1 | 5 | 3 | - | - | |
| Sector 6 North Trussway 2 | 7 | 4 | - | Obtain Lightning: DISSIDIA FF (scroll). |
|
| Brand of Despair | 5 | 3 | - | Use Paradigm Shift to prevail. |
|
| Bridge: Sector 6 Exit | 5 | 3 | - | - | |
| Bridge: Sector 7 Entrance | 6 | 3 | - | Obtain Lindblum (scroll) |
- |
| Sector 7 South Trussway 1 | 6 | 3 | - | ||
| Sector 7 South Trussway 2 | 6 | 3 | - | Obtain Percival (scroll). |
- |
| Quarantine Bridge: Switch | 6 | 3 | Switch | - | |
| Quarantine Bridge: Switch 2 | 6 | 3 | Switch | - | |
| Quarantine Bridge: Switch 3 | 6 | 3 | Switch | - | |
| Sector 7 Central Trussway 1 | 6 | 3 | - | - | |
| Sector 7 Central Trussway 2 | 7 | 4 | - | ||
| Quarantine Bridge: Boarding | 6 | 3 | - | - | |
| Quarantine Bridge: Disembarkment | 6 | 3 | - | - | |
| Sector 7 East Trussway 1 | 7 | 4 | - | Obtain Manadrive Vanille. |
- |
| Sector 7 East Trussway 2 | 6 | 3 | - | - | |
| Purge Chamber | 6 | 3 | - | Use Paradigm Shift to prevail. |
|
| Sector 7 Central Trussway 3 | 7 | 4 | - | Obtain Gargoyle (scroll). |
|
| Blockade Bridge: Switch | 6 | 3 | - | ||
| Blockade Bridge: Boarding | 6 | 3 | - | - | |
| Blockade Bridge: Disembarkment | 6 | 3 | - | - | |
| Sector 7 North Trussway | 6 | 3 | - | ||
| Brand of the Abyss | 6 | 3 | - | Use Paradigm Shift to prevail. |
|
| Bridge: Sector 7 Exit | 7 | 4 | - | ||
| Shipping Bridge: Sector 8 Entrance | 7 | 4 | - | - | |
| Shipping Bridge: Switch | 7 | 4 | Switch | - | |
| Sector 8 North Trussway 1 | 7 | 4 | - | Obtain Manadrive Sazh. |
|
| Sector 8 North Trussway 2 | 7 | 4 | - | ||
| Shipping Bridge: Connector | 7 | 4 | - | - | |
| Sector 8 Radial | 7 | 4 | - | ||
| Sector 8 Detour A | 7 | 4 | - | Obtain Iris (scroll). |
|
| Coupling Bridge A: Switch | 7 | 4 | Switch | - | |
| Sector 8 Detour B | 7 | 4 | - | ||
| Coupling Bridge B: Switch | 7 | 4 | Switch | - | |
| Sector 8 Central Trussway 1 | 7 | 4 | - | Obtain Centaur (scroll). |
- |
| Sector 8 Central Trussway 2 | 7 | 4 | - | - | |
| Coupling Bridge A: Connector | 7 | 4 | - | - | |
| Coupling Bridge B: Connector | 7 | 4 | - | - | |
| Sector 8 East Trussway | 7 | 4 | Obtain Deus Ex Machina (scroll). |
||
| Brand of Brilliance | 7 | 4 | - | Use Paradigm Shift to prevail. |
|
| Final Sector: Entrance | 8 | 4 | - | - | |
| Escape Bridge: Boarding | 8 | 4 | - | - | |
| Escape Bridge: Disembarkment | 8 | 4 | - | - | |
| Final Sector: Central Trussway 1 | 8 | 4 | - | ||
| Final Sector: Central Trussway 2 | 8 | 4 | - | ||
| Departure Bridge: Boarding | 8 | 4 | - | - | |
| Departure Bridge: Disembarkment | 8 | 4 | - | - | |
| Last Gate | 8 | 4 | Use Paradigm Shift to prevail. |
||
| Brand of Rekindled Light | 8 | 4 | - | The time for Lightning's revival nears. Yet that time will also be farewell. |
Post-completion areas
Once the player finishes Sectors 6, 7, 8 and Final, areas with special rewards gain boss marks to point them out:
| Area | Stamina | Battles | Enemy notes |
|---|---|---|---|
| Sector 6 West Trussway 1 | 7 | 4 | Obtain Zidane: DISSIDIA FF (scroll). |
| Sector 6 Central Trussway 3 | 7 | 4 | Obtain Manadrive Fang. |
| Sector 6 North Trussway 2 | 7 | 4 | Obtain Lightning: DISSIDIA FF (scroll). |
| Sector 7 Central Trussway 2 | 7 | 4 | |
| Sector 7 East Trussway 1 | 7 | 4 | Obtain Manadrive Vanille. |
| Sector 7 Central Trussway 3 | 7 | 4 | Obtain Gargoyle (scroll). |
| Sector 8 North Trussway 1 | 7 | 4 | Obtain Manadrive Sazh. |
| Sector 8 North Trussway 2 | 7 | 4 | |
| Sector 8 Detour A | 7 | 4 | Obtain Iris (scroll). |
| Sector 8 Central Trussway 1 | 7 | 4 | Obtain Centaur (scroll). |
Note that these are not all the special areas! Extras were added on the May 2018 event to include Scrolls for the April 2018 Vesna Krasna batch:
| Area | Stamina | Battles | Enemy notes |
|---|---|---|---|
| Sector 6 Central Trussway 1 | 5 | 3 | Obtain Chrysaor (scroll). |
| Sector 6 Central Trussway 4 | 5 | 3 | Obtain Raksasa (scroll). |
| Bridge: Sector 7 Entrance | 6 | 3 | Obtain Lindblum (scroll) |
| Sector 7 South Trussway 2 | 6 | 3 | Obtain Percival (scroll). |
| Coupling Bridge A: Switch | 7 | 4 | Obtain Stribog (scroll). |
| Sector 8 East Trussway | 7 | 4 | Obtain Deus Ex Machina (scroll). |
Challenge areas
Also, two extra sections open up.
- The ∞ Sector is a set of areas for collecting EXP and Crystals, similar to the Gigantuar Terrace region. It's divided into element-specific areas for gathering EXP and "Manadrive" fusion materials, the Gigantuar Battlefield for gathering Crystals and Fractals, and the Sicarius areas for challenging the four main foes. Like a Battle Tower, these last four foes get progressively harder each time you defeat them, but they also drop Quartz Components.
- The Ultimate Realm is a set of areas with extremely difficult fights.
Clearing each of three for the first time gives in reward Ability Tickets x100.
| Area | Stamina (later runs) |
Battles (later runs) |
Enemy notes | Reward |
|---|---|---|---|---|
| ∞ Sector Entrance | 6 | 3 | - | |
| Gigantuar Battlefield | 6 | 6 | Rare Crystal Gigantuar spotted! High EXP-gain area. |
|
| Battlefield of Earth | 6 | 6 | High EXP-gain area. |
|
| Battlefield of Light | 6 | 6 | High EXP-gain area. |
|
| Battlefield of Darkness | 6 | 6 | High EXP-gain area. |
|
| Battlefield of Flame | 6 | 6 | High EXP-gain area. |
|
| Battlefield of Water | 6 | 6 | High EXP-gain area. |
|
| Battlefield of Wind | 6 | 6 | High EXP-gain area. |
|
| Bahamut | 5 | 1 | The more times you defeat this enemy, the stronger it becomes. |
|
| Odin | 5 | 1 | The more times you defeat this enemy, the stronger it becomes. |
|
| Hecatoncheir | 5 | 1 | The more times you defeat this enemy, the stronger it becomes. |
|
| False Lightning | 5 | 1 | The more times you defeat this enemy, the stronger it becomes. |
|
| Ultimate Realm: Alpha | 10 | 3 | Are you ready for the challenge? |
|
| Ultimate Realm: Omega | 10 | 3 | Are you ready for the challenge? |
|
| Ultimate Realm: Mobius | 10 | 3 | Are you ready for the challenge? |
Key Items
- CP - Crystogen Points for upgrading your paradigms.
- Crystal Key Lv. 4
- Crystal Key Lv. 5
- Bahamut Mark
- Odin Mark
- Hecatoncheir Mark
- False Lightning Mark
Prizes
Special prizes that can be picked up include:
- Odin Quartz, Bahamut Quartz and Hecatoncheir Quartz
- Gigantuar Bulb★3
- Fractals, Pneuma, and Mog Amulet★4s
- Extranger★4s and Silver Openers
- Blazefire Saber bis and X -- upgrades for the sword you received in Part 1 -- are in the Crystarium II.
- Zidane: DISSIDIA FF (scroll)
- Lightning: DISSIDIA FF (scroll)
- Chrysaor (scroll)
- Raksasa (scroll)
- Lindblum (scroll)
- Percival (scroll)
- Gargoyle (scroll)
- Iris (scroll)
- Stribog (scroll)
- Centaur (scroll)
- Deus Ex Machina (scroll)
Special Fiends
- PSICOM Soldiers
- Pantherons
- Cie'th Ghasts
- Manasvin Warmechs
- Bahamut
- Hecatoncheir
- Odin
- False Lightning
- Crystal Gigantuar