
| “ | Final Fantasy X & Mobius FF
If we should get separated, just whistle... |
„ |
| ~ In-game description |
Dream Within a Dream, Part 3 or Episode 3, is the third main story chapter for the Final Fantasy X Collaboration Event. It features Tidus and Yuna from Final Fantasy X traversing an unnamed island while teaching Wol the art of summoning Aeons.
Event Details[]
- First appearance: September 14 - November 30, 2018
- Second appearance: January 15 -
March 30, 2020end of service, June 2020 - Event type: Collaboration story region.
How to Participate[]
- Select "FFX Episode 3: Visions of Besaid" from the world map -- branched off of the Chapter 1: Blank Slate node.
- You must complete Dream Within a Dream, Part 2 before this region becomes available.
Story[]
Continued from Dream Within a Dream, Part 2

Tidus walks ashore on an unnamed island, towards the visage of Yuna. He is shocked beyond words, but after some stammering they embrace. It's a while before Tidus can compose himself to ask the important question: is she supposed to be here? and is this Spira or Palamecia?
Wol is not far behind, and brings a bit of reality to the pair: be prepared for a world against them. But they're ready, even though there are no Aeons left... including Tidus. Wait, what? And with that, the truth is out. Tidus was summoned to Spira, like any of the Aeons, and the only way to end the cycle of death there was for all Aeons to be taken down... including Tidus. So when the Aeons apparently shifted to Palamecia, Tidus came with them. This gives Wol an idea. Maybe those Aeons could be summoned here! Yuna is unwilling to try, but happily transfers... something... to Wol, saying that he should now be able to summon them. This may take some learning, though.
Tidus and Yuna are in a bit of a bind, overall. They're both in a new, strange land. Tidus isn't so concerned about himself, but very much wants to help Yuna return to Spira... except both Wol and Echo are pessimistic about the idea that it's possible. The couple will need some time to cope with the new reality they seem to have.
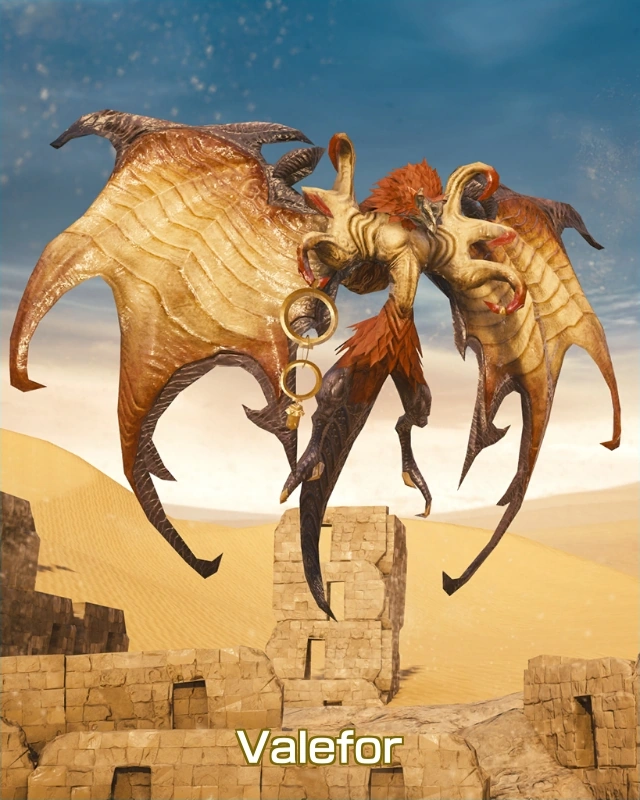
The group seems to be in the right place for learning. Wol quickly runs into a training ground, with riddles and trials. At first they're fairly easy riddles, but as always they get more complex as he advances. Good thing, too, because it's a surprise when they run into their first Aeon: Yojimbo! The battle is not an easy one, but Wol comes out on top, taking Yojimbo down. It seems over until a cloud of Pyreflies revives Yojimbo, stronger than before! With a gentle push from Yuna, Wol concentrates and Summons Valefor! The rematch sees Valefor victorious, and Yojimbo disappears in a flurry of more Pyreflies.
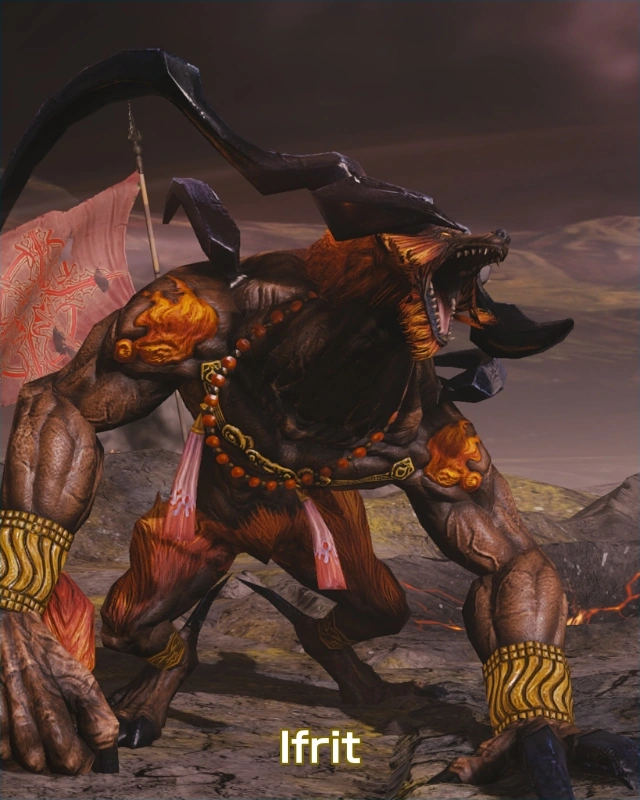
Wol continues to train, and soon after he lands a second Aeon: Ifrit. This is looking good! Meanwhile, Tidus and Yuna make the decision to pursue the Warrior of Light title together. Wol sounds positive, but privately doubts they'll get anywhere. Palamecia is too harsh about that.

The next step for them is to see what the local Runic Crystal has to say. Strangely, it says the Warrior of Light needs to defeat something called a Gigaflan, which Echo confirms is part of The Prophecy.
The team find the Gigaflan's lair, and Tidus launches himself into the fight... only to be rebuffed by an impenetrable field around the flan. Once again, Wol steps up and cleans the flan out.
But this leaves a problem. Palamecia has definitively declared that Tidus cannot be the Warrior of Light. He's a heretic. Tidus is crushed. Why would he be here in Palamecia if that's not an option? If the team can't find an answer, Tidus and Yuna are surely doomed. But Yuna has an idea, and suggests they go back to the last place that they had such a crisis of confidence.
To be continued in Dream Within a Dream, Part 4.
Summoning[]
This region introduces a new gameplay style: the Summoning System. The Sub-deck that normally holds your second (backup) job is replaced by one of the Aeons from Final Fantasy X.
- Once you gain your first Aeon, the red Aeons button will show up on the edge of the screen. Click this to see the stats for the Aeons you have, and to select which one will be summoned during battle.
- During battle, the Job Change Recast button at the bottom of the screen is replaced with a Summon. Select and drag across the circle to bring in the Aeon, or to swap back to your normal Job.
- Aeons come with a pre-set selection of abilities -- no equipping your own abilities, and Card Rentals are not available when the Aeon is in play.
- Normally, the Job Change action becomes available after 2-4 rounds, depending on how many Job Change Recast buffs you have. Aeons are always available after the first round of battle has completed, regardless of Recast buffs. As you go to further skirmishes within the same battle, your character will switch back to your main deck, but this can be immediately switched to the Aeon sub-deck (at the expense of 1 action, of course).
- The Aeon auto-ability No Summoning Recast drops this delay to zero -- bring in your Aeon at any time!
- If an Aeon drops to zero health, you will be forcibly returned to your Main Deck, rather than losing the battle. This means that an Aeon can sacrifice itself to take one mega-attack from a powerful enemy per area. You can't use that Aeon again during that battle, but (like you) it returns to full health on the next area, or (if you also get killed) it will revive with your use of a Phoenix Down.
- Aeons will increase their strength depending on your Deck Level, so equipping high-level cards on your main deck will get you strong Aeons.
- Aeons also get their own Aeon Sphere Grid to increase their abilities and offer new Auto-Abilities. Use
 Aeon Growth Spheres and Aeon Key Spheres there.
Screen controls[]
Four controls appear as your abilities grow:
![]() Go to the Sphere Grid or Aeon Sphere Grid through this control.
Go to the Sphere Grid or Aeon Sphere Grid through this control.
![]() This shows the list of Spheres you've collected, that have not been activated yet.
This shows the list of Spheres you've collected, that have not been activated yet.
Shows you the effects of everything you currently have activated. Use the icons on the top bar to switch between your character enhancements and the Aeon enhancements, or filter between different enhancement types.
![]() Lists the Aeons you have available, and shows their total attributes.
Lists the Aeons you have available, and shows their total attributes.
Event Map[]

| “ | FFX: Dream Within a Dream Episode 3: Visions of Besaid Tidus finds himself washed up on a sunny shore reminiscent of Besaid. A reunion with the one he has been longing to see has come to pass -- but is it real, or just another dream? |
„ |
| ~ World Map description |
As you traverse the region, you'll receive Spheres as a reward, which you can use in the Sphere Grid and Aeon Sphere Grid to enhance stats and add extra Auto-Abilities. The fiends will get stronger to compensate for that, so be prepared for some heavy fighting!
There are 80 areas in total, with 37 treasure chests.
Areas[]
| Area | Stamina | Battles | Lock requirements | Description | Reward |
|---|---|---|---|---|---|
| Visions of Besaid | 4 | 3 | (starting point) | - | |
| A Chance Meeting | 3 | 2 | - | ||
| The Aurochs' Fields | 4 | 3 | Lv.6 | ||
| Gullwing Landing | 4 | 3 | |||
| Seekers' Promontory | 3 | 2 | |||
| Summer's Boon | 4 | 3 | |||
| Remembrance Highlands | 4 | 5 | |||
| Moldy Ruins | 4 | 3 | |||
| Keepa's Training Grounds | 4 | 3 | |||
| Booming Cliffs | 4 | 3 | |||
| Coral Reef | 4 | 3 | |||
| Trial of the Summoner: Entrance | 5 | 4 | |||
| Forest of the Fayth | 4 | 3 | |||
| Piligrim's Path | 4 | 3 | |||
| Mysterious Inscription (1) | 4 | 3 | |||
| Shaded Trail | 5 | 4 | |||
| Rickety Bridge | 4 | 3 | |||
| Forbidden Outpost
(Golden Flan Battlegrounds Redux) |
8 | 8 | Upon the sign is written "Do not enter."
On the ground are scattered golden seeds and cactuar seeds. |
High SkillSeeds, Gil, and XP! + | |
| Braska Falls | 5 | 4 | |||
| To New Riddle | 5 | 4 | Go to Braska Falls | ||
| Scenic Route | 3 | 2 | |||
| Ancient Ruins | 4 | 3 | |||
| Mysterious Inscription (2) | 5 | 2 | A riddle is inscribed on the stone. |
||
| Summoner's Altar | 4 | 3 | Defeat enemies with water abilities in Mysterious Inscription (2) | ||
| Besaid Promontory | 4 | 1 | The mountain pass is filled with the luminous pyreflies. You sense a
|
||
| Yevon's Tablet | 7 | 6 | |||
| Trial of the Aeons: Entrance | 5 | 4 | (Set an |
There a still many more trials to overcome you can call yourself a summoner.
Use the power of summoning to overcome your trial! |
|
| Trial of the Aeons 1 | 6 | 4 | Use the power of summoning to overcome your trial! Start by summoning Valefor! |
||
| Trial of the Aeons 2 | 6 | 4 | Trial of the Aeons 1
Summon Valefor |
Use the power of summoning to overcome your trial! Defeat 3 or more enemies with Valefor's |
Lv.1
|
| Trial of the Aeons 3 | 7 | 5 | Trial of the Aeons 2
Use Valefor's |
Use the power of summoning to overcome your trial! Defeat 3 or more enemies with Valefor's |
|
| Trial of the Aeons 4 | 7 | 5 | Trial of the Aeons 3
Use Valefor's |
Use the power of summoning to overcome your trial! Defeat 4 or more enemies with Valefor! |
|
| Altar of the Aeons | 10 | 3 | Trial of the Aeons 4
Defeat 4 or more enemies with Valefor |
Use the power of summoning to overcome your trial! Use Valefor's absorb ability to fight through a powerful attack! |
|
| Kimahri Citadel | 4 | 3 | |||
| Lookout Spot | 4 | 3 | Lv.7 | ||
| Beaten Path | 4 | 3 | |||
| Waterfall: Upstream | 4 | 3 | |||
| Hero's Trial: Entrance | 4 | 3 | |||
| Mysterious Inscription (3) | 4 | 3 | |||
| Battleground of Light 1 | 3 (4) | 3 |
|
||
| Battleground of Dark 1 | 3 (4) | 3 |
|
||
| Battleground of Light 2 | 3 (5) | 3 (4) |
|
||
| Battleground of Dark 2 | 3 (4) | 3 |
|
||
| Lux vs. Umbra | 4 | 4 (3) | "Banish the darkness with light." Solve the riddle! |
||
| Mysterious Inscription (4) | 4 | 3 | Defeat only dark enemies. | ||
| Rite of Fire | 1 (5) | 1 (2) | This appears to be a ritual for summoning Anima. Offer up
|
||
| Rite of Water and Wind | 1 (5) | 1 (2) | This appears to be a ritual for summoning Anima. Offer up
|
||
| Hero's Altar | 3 | 3 (2) | Offer fire, water and wind elements to Elements Eaters | This altar is surrounded by an ominous power. You sense a The ritual has awoken
|
|
| Road to Prophecy | 6 | 5 | |||
| Path of the Pious | 4 | 4 (3) |
|
||
| Besaid Runic Temple | 5 | 3 | |||
| Road of Trials | 5 | 3 | |||
| Ifrit's Altar | 5 | 4 | Use the power of summoning to earn Ifrit's respect! |
||
| Ifrit's Trial 1 | 5 | 4 | Use the power of summoning to overcome your trial! Start by defeating 5 or more enemies with Ifrit! |
||
| Ifrit's Trial 2 | 5 | 4 | Ifrit's Trial 1
Defeat 5 or more enemies with Ifrit. |
Use the power of summoning to overcome your trial! Defeat 4 or more enemies with Ifrit's |
|
| Ifrit's Trial 3 | 5 | 4 | Ifrit's Trial 2
Defeat 4 or more enemies with Ifrit's |
Use the power of summoning to overcome your trial!
Defeat 10 or more enemies with Ifrit's |
|
| Ifrit's Final Trial | 5 | 4 | Ifrit's Trial 3
Defeat 10 or more enemies with Ifrit's |
Use the power of summoning to overcome your trial!
With Ifrit by your side, conquer your last trial! |
|
| Runic Temple: B1 | 7 | 5 | |||
| Runic Temple: B2 | 6 | 4 | |||
| Runic Temple: Lowest Floor | 8 | 5 | Use the power of summoning to defeat your enemies. |
Lv.7 | |
| To the Ruins | 5 | 3 | |||
| Gigaflan's Haunt: Entrance | 4 | 2 | |||
| Ruined Lookout | 5 | 3 | |||
| Slatternly Nest | 5 | 4 | |||
| Mysterious Inscription (5) | 5 | 3 | "Light shines where the two meets once more" |
||
| Chapel of Wisdom | 4 | 2 | Go to Visions of Besaid. | ||
| Battered Cliffs | 4 | 2 | |||
| Mysterious Inscription (6) | 4 | 2 | "Bathe wings in Hellfire" |
||
| Chapel of Devotion | 5 | 3 | Go to Slatternly Nest and roast the Cockatrice with Ifrit's Hellfire. | ||
| Debris-strewn Road | 5 | 3 | |||
| Mysterious Inscription (7) | 4 | 1 | A riddle is inscribed on the stone. |
||
| Chapel of Benevolence | 4 | 2 | Defeat the Idol Head without attacking the cactuars. | ||
| Treacherous Path | 5 | 3 | |||
| Lair of the Gigaflan | 13 | 4 | The Tidus and Yuna have gone ahead. Use the power of summoning to defeat your enemies. |
||
| Ruins Back Entrance | 5 | 3 | |||
| Floating Stones | 5 | 3 | Lv.2 | ||
| Morphing Path | 5 | 4 | Tidus and Yuna have gone ahead.
Instead, an army of Flans awaits. |
||
| Fragments of Dreams | 6 | 4 | |||
| Turgid Cove | 5 | 3 | |||
| Gentle Shallows | 6 | 4 | |||
| Teleport Stone | 8 | 4 (3) | Garuda sighted. |
Pyrefly: FFX (Card) |
Post-completion[]
Once the Teleport Stone area has been cleared, the Forbidden Outpost area changes to Golden Flan Battlegrounds Redux. The same rules continue here, with the appearance of ![]() Golden Flans offering drops of random
Golden Flans offering drops of random ![]() Skillseeds x3000, but are now joined by Cactuars and
Skillseeds x3000, but are now joined by Cactuars and ![]() Crystal Gigantuars. This area does not appear to drop any ability cards after the change.
Crystal Gigantuars. This area does not appear to drop any ability cards after the change.
Key Items[]
These items are gathered to unlock spaces on the Sphere Grid and Aeon Sphere Grid.
- Attribute Sphere
- Auto-Ability Sphere (green)
- Auto-Ability Sphere (blue)
- Key Sphere
- Aeon Growth Sphere
- Aeon Key Sphere
- Valefor Sphere
- Ifrit Sphere
These items unlock paths in Besaid.
- Besaid Promontory Key
- Key of Perfervidity
- Runic Temple Key
- Novice Summoner Badge
- Unsealer's Badge
Aeons[]
- Yojimbo (Aeon) shows up as an adversary, but cannot be summoned.
- Valefor (Aeon) is gained as an ally early in the region.
- Ifrit (Aeon) is gained as an ally in the later parts of the region.
Special Fiends[]
Reference[]
Trivia[]
- Music is from Final Fantasy X Remaster soundtrack:
| Area | FFX track name |
|---|---|
| Opening movie, first areas, last areas | Yuna's Theme |
| Battle theme | Battle Theme |
| Victory theme | Victory Fanfare |
| areas outside the Trials | Besaid Theme |
| Trial of the Summoner, Runic Temple | Hymn of the Fayth |
| Trial of the Aeons, Gigaflan | A Contest of Aeons |
| Hero's Trial | The Trials |
| Battle with Ifrit | Enemy Attack |
| Gigaflan's Haunt | Auron's Theme |
| Final stretch | Out of the Frying Pan |
| Ending movie | Yuna's Decision |