
| “ | Final Fantasy X & Mobius FF
What would an adult do then? |
„ |
| ~ In-game description |
Dream Within a Dream - Conclusion: A Fleeting Dream is the final story chapter for the Final Fantasy X Collaboration Event. It features Tidus and Yuna from Final Fantasy X returning to Zanarkand (or Palamecia's equivalent) looking for a way back to their home of Spira.
Event Details[]
- First appearance: October 15 - November 30, 2018
- Second appearance: February 1 -
April 1, 2020end of service, June 2020 - Event type: Collaboration story region.
How to Participate[]
- Select "FFX Conclusion: A Fleeting Dream" from the world map -- branched off of the Chapter 1: Blank Slate node.
- You must complete Dream Within a Dream, Part 4 before this region becomes available.
Story[]
Continued from Dream Within a Dream, Part 4
Tidus and Yuna have arrived back in the ruins of Zanarkand -- which we left in Episode 2 -- with Wol and Echo tagging along. Somewhere in this space might be a way back to Spira. Tidus seems intent on getting Yuna there, while expecting that there is no role left for him in Spira. However, Tidus is unaware that this is not the real Yuna, and her intent is to get him back to Spira without her.
When last we were here, a barrier was blocking the entrance to the main Blitzball Dome. Seems like a good place to start. Sure enough, the barrier is still there, but a wave of Yuna's hand makes the barrier fall. Apparently it's a summoner thing. This was the final destination for summoners in Spira, after all. Only worthy summoners could pass. The party step through into the Farplane.
The Farplane is rife with pyreflies. Yuna explains that they absorb and react to the thoughts of people around them. She asks for a boon, and the pyreflies conjure a Crystal for Tidus, but it's dim. If Tidus can fill it with the Light of Hope, then it will guide them to Spira. So the objective will be to find enough pyreflies.
While Wol is handling the inevitable Trials in their path, Tidus gets an idea, and dashes off on his own. If he can kill the fiends in his way, it increases his own hope, and the pyreflies will respond in kind. It seems to work -- the Crystal is getting brighter.
more to come
Gameplay[]
Screen controls[]
Four controls appear as your abilities grow:
![]() Go to the Sphere Grid through this control.
Go to the Sphere Grid through this control.
![]() This shows the list of Spheres you've collected, that have not been activated yet.
This shows the list of Spheres you've collected, that have not been activated yet.
Shows you the effects of everything you currently have activated. Use the icons on the top bar to switch between your character enhancements and the Aeon enhancements, or filter between different enhancement types.
![]() Lists the Aeons you have available, and shows their total attributes.
Lists the Aeons you have available, and shows their total attributes.
Summoning[]
This region continues the Summoning System. The Sub-deck that normally holds your second (backup) job is replaced by one of the Aeons from Final Fantasy X.
- Click on the red Aeons button to see the stats for the Aeons you have, and to select which Aeon will be summoned during battle.
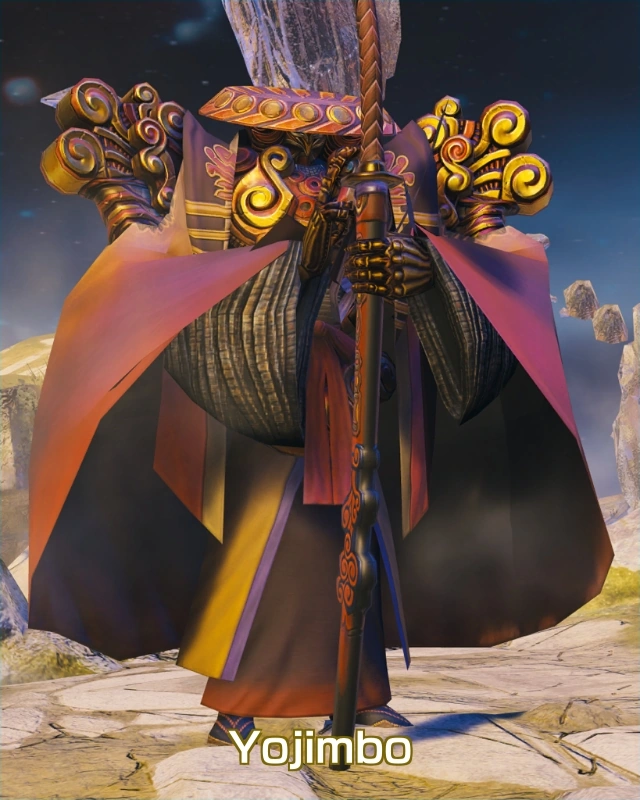
- The Conclusion offers one last Aeon:
 Yojimbo.
- The Conclusion offers one last Aeon:
- During battle, the Job Change Recast button at the bottom of the screen is replaced with a Summon. Select and drag across the circle to bring in the Aeon, or to swap back to your normal Job.
- Aeons come with a pre-set selection of abilities -- no equipping your own abilities, and Card Rentals are not available when the Aeon is in play.
- Normally, the Job Change action becomes available after 2-4 rounds, depending on how many Job Change Recast buffs you have. Aeons are always available after the first round of battle has completed, regardless of Recast buffs. As you go to further skirmishes within the same battle, your character will switch back to your main deck, but this can be immediately switched to the Aeon sub-deck (at the expense of 1 action, of course).
- The Aeon auto-ability No Summoning Recast drops this delay to zero -- bring in your Aeon at any time!
- If an Aeon drops to zero health, you will be forcibly returned to your Main Deck, rather than losing the battle. This means that an Aeon can sacrifice itself to take one mega-attack from a powerful enemy per area. You can't use that Aeon again during that battle, but (like you) it returns to full health on the next area, or (if you also get killed) it will revive with your use of a Phoenix Down.
- Aeons will increase their strength depending on your Deck Level, so equipping high-level cards on your main deck will get you strong Aeons.
- Aeons also get their own Aeon Sphere Grid to increase their abilities and offer new Auto-Abilities. Use Aeon Growth Spheres and Aeon Key Spheres there.
Event Map[]

| “ | FFX: Dream Within a Dream Conclusion: A Fleeting Dream Will the crystals provide a way back to Spira... or yet more lights with false hope? Will Tidus finally come to grips with his own story? |
„ |
| ~ World Map description |
As you traverse the region, you'll receive Spheres as a reward, which you can use in the Sphere Grid and Aeon Sphere Grid to enhance stats and add extra Auto-Abilities. The fiends will get stronger to compensate for that, so be prepared for some heavy fighting!
There are 88 areas in total, with 28 treasure chests.
The Trials[]
Each of the trials in this region has you looking for a Key, which will open the way to the exit. In each trial, you will run into Pure Elementals that will lock out their opposite element. However, if you have the Aeon for that element selected, then summoning that Aeon will immediately remove the lockout... and the Aeon can load a large amount of damage on them with its counter-element!
- Braska's Trial casts Fire Lockout. Use Ifrit.
- Yocun's Trial casts Water Lockout. Use Shiva.
- The Labyrinth of Trials has a direct path of 1-4-8-9, as marked in the area list. (up, left, down, left, up), but you'll also want to hit the Labyrinth Vault for its loot.
- Ohalland's Trial casts Dark Lockout. Use Anima if you have it.
- Get Ohalland’s Key from the left branch, insert the key in Ohalland’s Altar on the bottom branch, then find Yevon’s Valkyrie on the top branch.
Gandof's Trial (the Chromatic Labyrinth) has no lockouts, but the fiends in the Chromatic Labyrinth areas will change to the same element as the last "switch" you stepped on. Most of the enemies are Flans, so an Aeon of opposite element will make short work of them.
- The correct order for the first Labyrinth is Blue - Red - Green.
- The correct order for the second Labyrinth is Yellow - Green - Red - Blue.
- The correct order for the third Labyrinth (the first two combined) is second Green - first Red - second Blue - second Red - first Green
At the end of each labyrinth is a Vault with treasures, protected by amazingly strong fiends. Seriously, don't attempt this one until the current labyrinth is complete, unless you're looking for a severe top-end challenge.
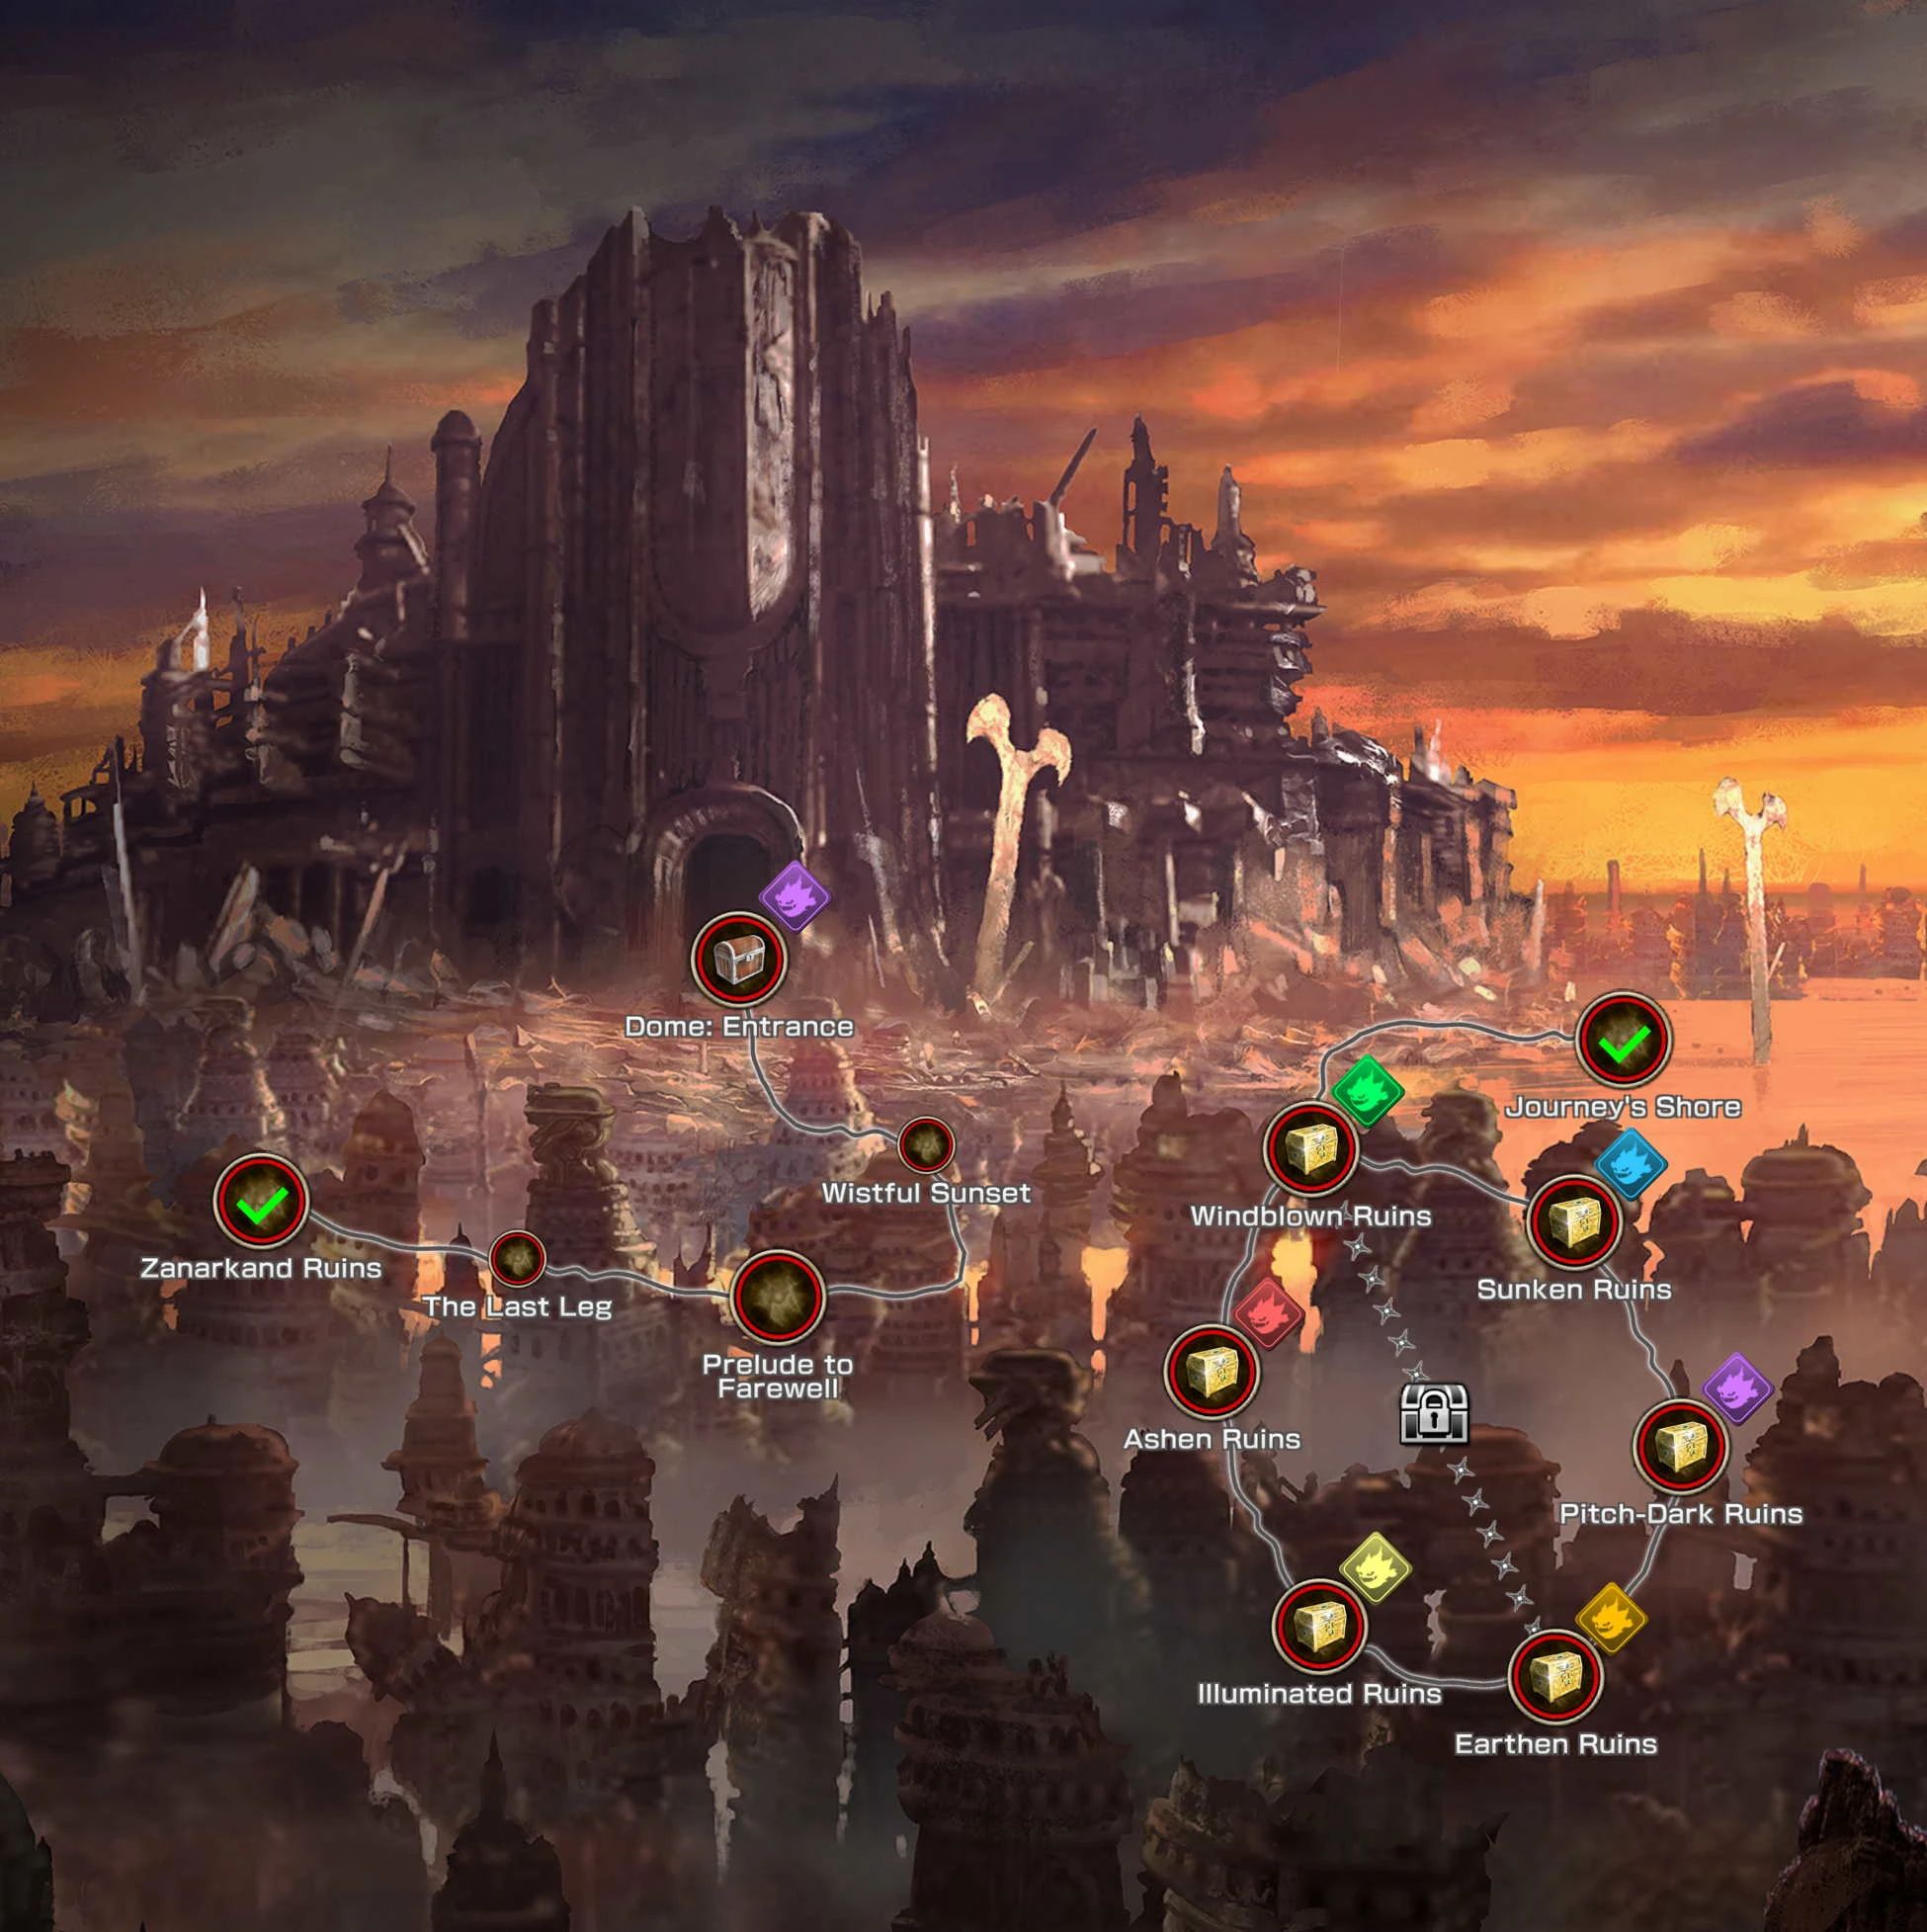
Areas: Zanarkand[]
| Area | Stamina | Battles | Lock requirements | Description | Reward |
|---|---|---|---|---|---|
| Zanarkand Ruins | 6 | 3 | (starting point) | - | |
| The Last Leg | 5 | 3 | - | - | |
| Prelude to Farewell | 6 | 3 | - | - | |
| Wistful Sunset | 8 | 4 | - | - | |
| Dome: Entrance | 10 | 3 | - |
Areas: Farplane[]
| Area | Stamina | Battles | Lock requirements | Description | Reward |
|---|---|---|---|---|---|
| Dome | 5 | 3 | (starting point) | - | |
| Fragments of Memory | 6 | 4 | - | - | |
| Braska's Trial | 10 | 3 | - | ||
| Critical Juncture | 6 | 3 | - | - | |
| Domain of the Dead | 5 | 3 | - | - | |
| Braska's Key | 6 | 3 | - | ||
| Braska's Altar | 10 | 3 | - | Use the power of the Aeons to bypass the |
|
| Sealed Path / Braska's Road | 6 | 3 | - | ||
| Flames of Devotion | 8 | 4 | - | - | |
| Flock of Pyreflies | 10 | 3 | - | Use the power of the Aeons to bypass the |
Lv.4 |
| Yocun's Trial | 5 | 3 | - | ||
| Buried Figments | 7 | 4 | - | - | |
| Yocun's Key | 10 | 3 | - | Use the power of the Aeons to bypass the |
|
| To Formless Path | 6 | 3 | - | - | |
| Worn Pathway | 8 | 4 | - | - | |
| Yocun's Altar | 10 | 3 | - | Use the power of the Aeons to bypass the |
|
| Labyrinth of Trials (1) | 5 | 3 | - | - | |
| Labyrinth of Trials (2) | 4 | 3 | - | - | |
| Labyrinth of Trials (3) | 4 | 2 | - | - | |
| Labyrinth of Trials (4) | 8 | 4 | - | Lv.9 | |
| Labyrinth of Trials (5) | 8 | 5 | - | - | |
| Labyrinth of Trials (6) | 4 | 4 | - | - | |
| Labyrinth Vault | 8 | 6 | - | ||
| Labyrinth of Trials (7) | 4 | 2 | - | - | |
| Labyrinth of Trials (8) | 4 | 3 | - | - | |
| Labyrinth of Trials (9) | 7 | 4 | - | - | |
| Flock of Fireflies | 10 | 3 | - | Use the power of the Aeons to bypass the |
|
| To Mercurial Isle | 6 | 3 | - | - | |
| Ohalland's Trial | 4 | 3 | - | ||
| Initiates' Steps | 10 | 2 | - | ||
| Teleportation Zone (water) | 3 | 2 | - | - | |
| Initiates Isle | 4 | 3 | go to Teleportation Zone (water) | - | |
| Precipitous Slope | 7 | 3 | - | - | |
| Element Eater / Empty Glade | 8 | 1 | - | It appears to crave |
Skill Coin ★3 x1 |
| Monolith | 8 | 5 | - | - | |
| Ohalland's Key | 10 | 3 | - | ||
| Mutable Steps | 10 | 2 | - | ||
| Teleportation Zone (earth) | 3 | 2 | - | - | |
| Mutable Isle | 6 | 4 | go to Teleportation Zone (earth) | - | |
| Nebulous Space | 7 | 3 | - | - | |
| Ancestors' Lament | 9 | 5 | - | - | |
| Element Eater / Empty Glade | 8 | 1 | - | It appears to crave |
|
| Ohalland's Altar | 10 | 3 | - | Use the power of the Aeons to bypass the |
|
| Soaring Steps | 10 | 2 | - | ||
| Teleportation Zone (wind) | 3 | 2 | - | - | |
| Soaring Isle | 4 | 4 | go to Teleportation Zone (wind) | - | |
| Tranquil Beacon | 10 | 6 | - | ||
| Yevon's Valkyrie | 7 | 4 | insert |
- | |
| Summoners' Destination | 7 | 4 | travel from Ohalland's Altar | - | |
| False Light | 8 | 5 | - | - | |
| Flock of Pyreflies | 10 | 3 | - | Use the power of the Aeons to bypass the |
Lv.5 |
| To the Final Trial | 4 | 3 | - | - | |
| Blue Switch | 8 | 4 | - | - | |
| Chromatic Labyrinth (lower) | 8 | 4 | - | - | |
| Chromatic Labyrinth (center) | 8 | 4 | - | - | |
| Red Switch | 8 | 4 | - | - | |
| Chromatic Vault | 8 | 5 | - | The This is not a battle you can win. Best turn back for now. The Guardian is nowhere to be seen... This is a golden opportunity to seize the treasure. |
|
| Chromatic Labyrinth (right) | 8 | 4 | - | - | |
| Green Switch | 8 | 4 | - | Lv.9 Lv.5 | |
| Second Gate | 7 | 4 | complete the first Labyrinth | ||
| Yellow Switch | 8 | 4 | - | - | |
| Chromatic Labyrinth (top) | 8 | 4 | - | - | |
| Green Switch | 8 | 4 | - | - | |
| Chromatic Labyrinth (center) | 8 | 4 | - | - | |
| Chromatic Vault | 8 | 5 | - | The This is not a battle you can win. Best turn back for now. The Guardian is nowhere to be seen... This is a golden opportunity to seize the treasure. |
|
| Red Switch | 8 | 4 | - | - | |
| Chromatic Labyrinth (bottom) | 8 | 4 | - | - | |
| Blue Switch | 8 | 4 | - | ||
| (complete third Labyrinth) | - | - | - | (Battles... or not... across previous Switch areas) | |
| Final Gate | 6 | 4 | complete the second Labyrinth | ||
| Flock of Pyreflies | 10 (5) | 3 | complete the third Labyrinth | Use the power of summoning to emerge from the final battle victorious! Pyreflies fill the air. They will sometimes drop the Pyrefly: FFX (Card). |
|
| Ifrit's Sanctum | 10 | 3 (2) | - | Use the power of summoning to emerge from the final battle victorious! |
|
| Shiva's Sanctum | 10 | 3 (2) | - | Use the power of summoning to emerge from the final battle victorious! |
|
| Anima's Sanctum | 10 | 3 (2) | - | Tidus has gone ahead. Catch up and fight by his side! |
|
| Valefor's Sanctum | 10 | 3 (2) | - | Use the power of summoning to emerge from the final battle victorious! |
|
| A Fleeting Dream | 8 | 2 | - | Listen to my story... This may be our last battle. |
New Aeon: Yojimbo) |
Post-completion[]
Once the story is complete, you are transported back to Zanarkand. If you wish to go back to the Farplane, teleport to the Dome:Entrance area. If for some reason you missed upgrading your copy of Tidus & Yuna: FFX (Card) to ★5, you can go back to the
In Zanarkand, there are 6 extra areas that drop ![]() Pendulums as prizes. Use these to open the chest in the center of the field for
Pendulums as prizes. Use these to open the chest in the center of the field for ![]() Yojimbo Spheres and other prizes.
Yojimbo Spheres and other prizes.
| Area | Stamina | Battles | Lock requirements | Description | Reward |
|---|---|---|---|---|---|
| Journey's Shore | 5 | 3 | (re)starting area | - | |
| Windblown Ruins | 10 | 5 | - | ||
| Sunken Ruins | 10 | 4 | - | ||
| Pitch-Dark Ruins | 10 | 4 | - | ||
| Earthen Ruins | 10 | 4 | - | ||
| Illuminated Ruins | 10 | 4 | - | ||
| Ashen Ruins | 10 | 4 | - |
Each run through these six areas will always drop ![]() Pendulum x20, alongside any
Pendulum x20, alongside any ![]() Skillseeds or
Skillseeds or ![]() Magicite you earn.
Magicite you earn.
Pendulum prizes[]
![]() Pendulums can be turned in at the center chest for these rewards, in order:
Pendulums can be turned in at the center chest for these rewards, in order:
| Prize | Cost |
|---|---|
| prizes then loop: | |
Golden Flan Battlegrounds - elements![]
Once the six Ruins spaces are cleared, they change into Golden Flan Battlegrounds areas! Like the area seen in Episode 1 and Episode 3, these areas are populated with Cactuars, Metal Cactuars, Gold Cactuars, Crystal Gigantuars, and Golden Flans. New to this region, though, is that they're isolated to one of the six single elements, so you can gather ![]() Skillseeds in exactly the element you wish!
Skillseeds in exactly the element you wish!
| Area | Stamina | Battles | Description |
|---|---|---|---|
| Golden Flan Battlegrounds: Earth | 8 | 8 | |
| Golden Flan Battlegrounds: Fire | 8 | 8 | |
| Golden Flan Battlegrounds: Light | 8 | 8 | |
| Golden Flan Battlegrounds: Wind | 8 | 8 | |
| Golden Flan Battlegrounds: Dark | 8 | 8 | |
| Golden Flan Battlegrounds: Water | 8 | 8 |
Key Items[]
These items are gathered to unlock spaces on the Sphere Grid and Aeon Sphere Grid.
- Attribute Sphere
- Key Sphere
- Aeon Growth Sphere
- Aeon Key Sphere
- Valefor Sphere
- Ifrit Sphere
- Shiva Sphere
- Anima Sphere
- Yojimbo Sphere
These items unlock paths in the Farplane:
- Braska's Key
- Yocun's Key
- Ohalland's Key
For post-completion prizes:
- Pendulum
Aeons[]
- Yojimbo (Aeon) is gained as an ally at the end of the region.
Special Fiends[]
Reference[]
Trivia[]
- Music is from Final Fantasy X Remaster soundtrack:
| Area | FFX track name |
|---|---|
| Opening movie | Zanarkand |
| Zanarkand areas | A Fleeting Dream |
| early Farplane areas | Decision on the Dock |
| various battles | Battle Theme |
| Ohalland's Trial end | The Truth Revealed |
| Gandof's Trial | Moment of Truth |
| The final battles | A Contest of Aeons |
| battle with Anima | Otherworld |
| Tidus finds his way | Yuna's Decision |
| The Final Showdown | Assault |
| Last Farewells | Ending Theme |
| Credits | Suteki Da Ne? (orchestra) |
| Golden Flan Battlegrounds | The Blitzers |